你的浏览器禁用了JavaScript, 请开启后刷新浏览器获得更好的体验!
首页
热门
推荐
精选
登录
|
注册
iOS 11之Vision人脸检测
立即下载
用AI写一个
金额:
3
元
支付方式:
友情提醒:源码购买后不支持退换货
立即支付
我要免费下载
发布时间:2019-08-14
42人
|
浏览:20838次
|
收藏
|
分享
技术:Objective-C
运行环境:xcode9,iOS 11
概述
iOS 11机器语言学习之Vision人脸检测及动态添加
详细
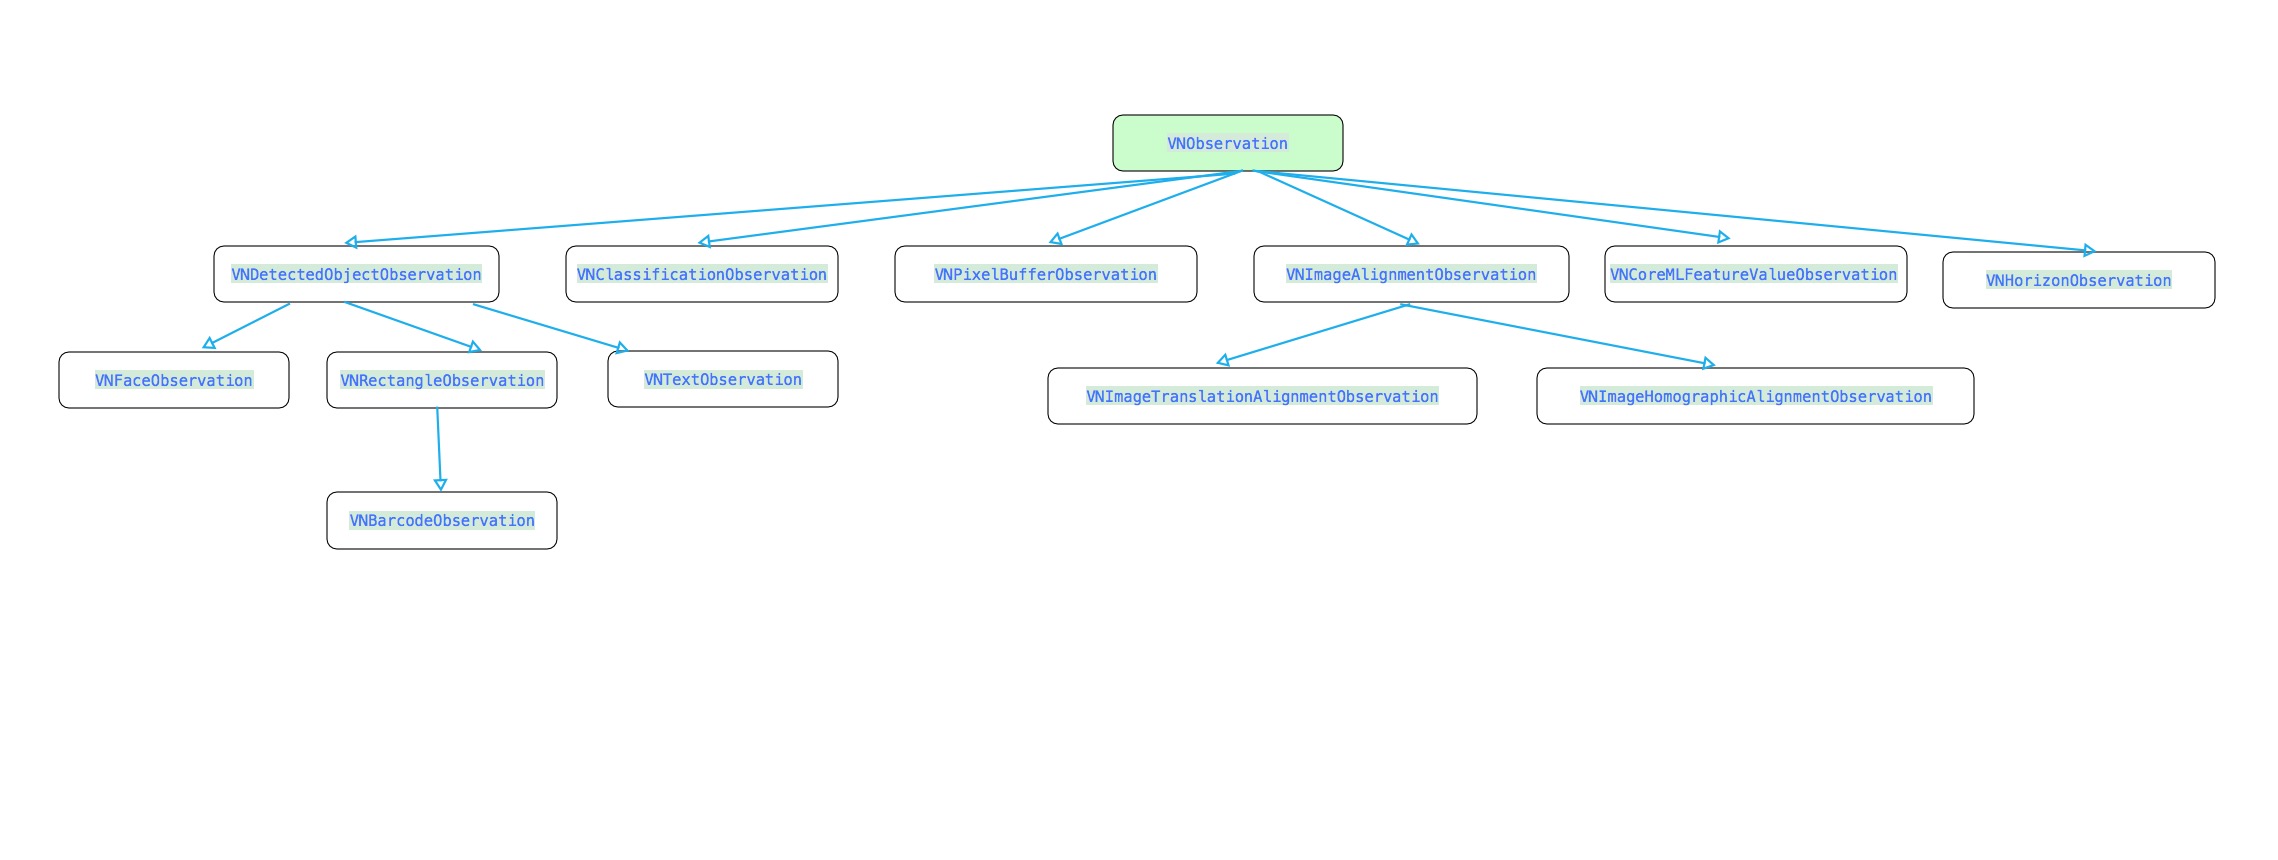
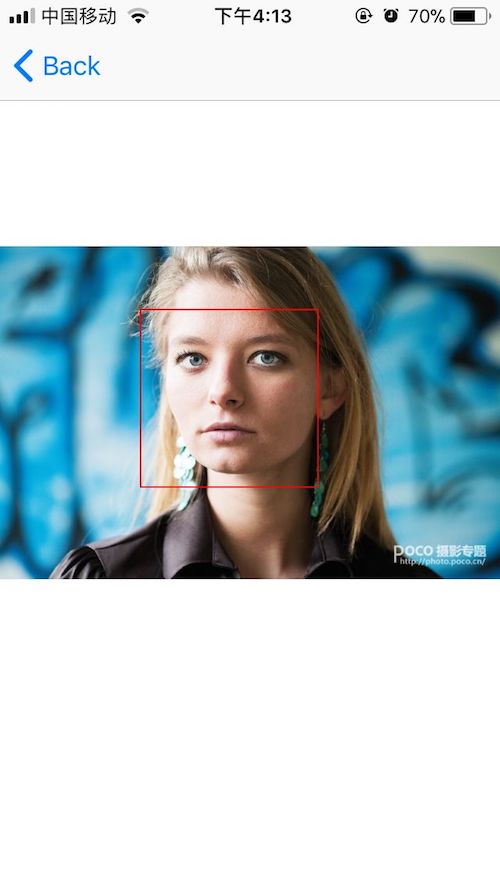
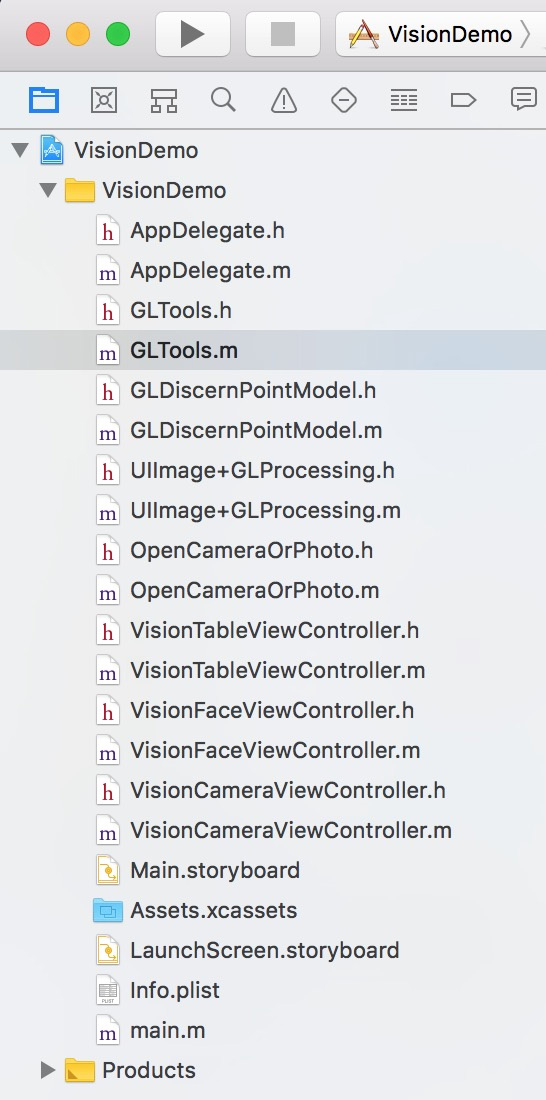
>大道如青天,我独不得出 #####前言 在上一篇`iOS Core ML与Vision初识`中,初步了解到了`vision`的作用,并在文章最后留了个疑问,就是类似下面的一些函数有什么用 ``` - (instancetype)initWithCIImage:(CIImage *)image options:(NSDictionary<VNImageOption, id> *)options; - (instancetype)initWithCVPixelBuffer:(CVPixelBufferRef)pixelBuffer options:(NSDictionary<VNImageOption, id> *)options; ``` 在查阅一些资料后,最终通过这些函数得到了如下的效果  对,没错,这就是通过`initWithCVPixelBuffer`函数来实现的。当然`vision`的作用远不于此,还有如下的效果 1、图像匹配(上篇文章中的效果) 2、矩形检测 3、二维码、条码检测 4、目标跟踪 5、文字检测 6、人脸检测 7、人脸面部特征检测 由于对人脸识别比较感兴趣,所以这里就主要简单了解了下人脸部分,下面就针对人脸检测和面部检测写写 #####Vision支持的图片类型 通过查看`VNRequestHandler.h`文件,我们可以看到里面的所有初始化函数,通过这些初始化函数,我们可以了解到支持的类型有: 1、`CVPixelBufferRef` 2、`CGImageRef` 3、`CIImage` 4、`NSURL` 5、`NSData` #####Vision使用 在使用`vision`的时候,我们首先需要明确自己需要什么效果,然后根据想要的效果来选择不同的类,最后实现自己的效果 1、需要一个`RequestHandler`,在创建`RequestHandler`的时候,需要一个合适的输入源,及`图片`类型 2、需要一个`Request `,在创建`Request `的时候,也需要根据实际情况来选择,`Request `大概有如下这么些  3、通过`requestHandler`将`request`联系起来,然后得到结果 ``` [handler performRequests:@[requset] error:&error]; ``` 4、处理结果`VNObservation`,在`VNRequest`的`results`数组中,包含了`VNObservation`结果,`VNObservation`也分很多种,这和你`Request`的类型是相关联的  在完成上述步骤后,我们就可以根据结果来实现一些我们想要的效果 #####人脸矩形检测 这里我们需要用到`VNDetectFaceRectanglesRequest` ``` requset = [[VNDetectFaceRectanglesRequest alloc] initWithCompletionHandler:completionHandler]; ``` 在得到结果后,我们需要处理下坐标 ``` for (VNFaceObservation *faceObservation in observations) { //boundingBox CGRect transFrame = [self convertRect:faceObservation.boundingBox imageSize:image.size]; [rects addObject:[NSValue valueWithCGRect:transFrame]]; } ``` ``` // 转换Rect - (CGRect)convertRect:(CGRect)boundingBox imageSize:(CGSize)imageSize{ CGFloat w = boundingBox.size.width * imageSize.width; CGFloat h = boundingBox.size.height * imageSize.height; CGFloat x = boundingBox.origin.x * imageSize.width; CGFloat y = imageSize.height * (1 - boundingBox.origin.y - boundingBox.size.height);//- (boundingBox.origin.y * imageSize.height) - h; return CGRectMake(x, y, w, h); } ``` 在返回结果中的`boundingBox `中的坐标,我们并不能立即使用,而是需要进行转换,因为这里是相对于`image`的一个比例,这里需要注意的是`y`坐标的转换,因为坐标系的`y`轴和`UIView`的`y`轴是相反的。 最后就是通过返回的坐标进行矩形的绘制 ``` + (UIImage *)gl_drawImage:(UIImage *)image withRects:(NSArray *)rects { UIImage *newImage = nil; UIGraphicsBeginImageContextWithOptions(image.size, NO, [UIScreen mainScreen].scale); CGContextRef context = UIGraphicsGetCurrentContext(); CGContextSetLineCap(context,kCGLineCapRound); //边缘样式 CGContextSetLineJoin(context, kCGLineJoinRound); CGContextSetLineWidth(context,2); //线宽 CGContextSetAllowsAntialiasing(context,YES); //打开抗锯齿 CGContextSetStrokeColorWithColor(context, [UIColor redColor].CGColor); CGContextSetFillColorWithColor(context, [UIColor clearColor].CGColor); //绘制图片 [image drawInRect:CGRectMake(0, 0,image.size.width, image.size.height)]; CGContextBeginPath(context); for (int i = 0; i < rects.count; i ++) { CGRect rect = [rects[i] CGRectValue]; CGPoint sPoints[4];//坐标点 sPoints[0] = CGPointMake(rect.origin.x, rect.origin.y);//坐标1 sPoints[1] = CGPointMake(rect.origin.x + rect.size.width, rect.origin.y);//坐标2 sPoints[2] = CGPointMake(rect.origin.x + rect.size.width, rect.origin.y + rect.size.height);//坐标3 sPoints[3] = CGPointMake(rect.origin.x , rect.origin.y + rect.size.height); CGContextAddLines(context, sPoints, 4);//添加线 CGContextClosePath(context); //封闭 } CGContextDrawPath(context, kCGPathFillStroke); //根据坐标绘制路径 newImage = UIGraphicsGetImageFromCurrentImageContext(); UIGraphicsEndImageContext(); return newImage; } ``` 效果如下  #####人脸特征识别 这里我们需要用到`VNDetectFaceLandmarksRequest` ``` requset = [[VNDetectFaceLandmarksRequest alloc] initWithCompletionHandler:completionHandler]; ``` 处理结果 ``` for (VNFaceObservation *faceObservation in observations) { //boundingBox CGRect transFrame = [self convertRect:faceObservation.boundingBox imageSize:image.size]; [rects addObject:[NSValue valueWithCGRect:transFrame]]; } pointModel.faceRectPoints = rects; return pointModel; } - (GLDiscernPointModel *)handlerFaceLandMark:(NSArray *)observations image:(UIImage *)image { GLDiscernPointModel *pointModel = [[GLDiscernPointModel alloc] init]; NSMutableArray *rects = @[].mutableCopy; for (VNFaceObservation *faceObservation in observations) { VNFaceLandmarks2D *faceLandMarks2D = faceObservation.landmarks; [self getKeysWithClass:[VNFaceLandmarks2D class] block:^(NSString *key) { if ([key isEqualToString:@"allPoints"]) { return ; } VNFaceLandmarkRegion2D *faceLandMarkRegion2D = [faceLandMarks2D valueForKey:key]; NSMutableArray *sPoints = [[NSMutableArray alloc] initWithCapacity:faceLandMarkRegion2D.pointCount]; for (int i = 0; i < faceLandMarkRegion2D.pointCount; i ++) { CGPoint point = faceLandMarkRegion2D.normalizedPoints[i]; CGFloat rectWidth = image.size.width * faceObservation.boundingBox.size.width; CGFloat rectHeight = image.size.height * faceObservation.boundingBox.size.height; CGPoint p = CGPointMake(point.x * rectWidth + faceObservation.boundingBox.origin.x * image.size.width, faceObservation.boundingBox.origin.y * image.size.height + point.y * rectHeight); [sPoints addObject:[NSValue valueWithCGPoint:p]]; } [rects addObject:sPoints]; }]; } ``` 在这里,我们需要注意到`landmarks `这个属性,这是一个`VNFaceLandmarks2D`类型的对象,里面包含着许多面部特征的`VNFaceLandmarkRegion2D`对象,如:`faceContour`,`leftEye`,`nose`....分别表示面部轮廓、左眼、鼻子。这些对象中,又包含下面这么一个属性 ``` @property (readonly, assign, nullable) const CGPoint* normalizedPoints ``` 这是一个包含该面部特征的的数组,所以我们可以通过下面的方式取出里面的坐标 ``` CGPoint point = faceLandMarkRegion2D.normalizedPoints[i]; ``` 当然这里面也存在坐标的转换,见上面代码 最后也是画线,代码如下 ``` + (UIImage *)gl_drawImage:(UIImage *)image faceLandMarkPoints:(NSArray *)landMarkPoints { UIImage * newImage = image; for (NSMutableArray *points in landMarkPoints) { CGPoint sPoints [points.count]; for (int i = 0;i <points.count;i++) { NSValue *pointValue = points[i]; CGPoint point = pointValue.CGPointValue; sPoints[i] = point; } //画线 UIGraphicsBeginImageContextWithOptions(newImage.size, NO, [UIScreen mainScreen].scale); CGContextRef context = UIGraphicsGetCurrentContext(); CGContextSetLineCap(context,kCGLineCapRound); //边缘样式 CGContextSetLineJoin(context, kCGLineJoinRound); CGContextSetLineWidth(context,2); //线宽 CGContextSetAllowsAntialiasing(context,YES); //打开抗锯齿 // 设置翻转 CGContextTranslateCTM(context, 0, newImage.size.height); CGContextScaleCTM(context, 1.0, -1.0); CGContextSetStrokeColorWithColor(context, [UIColor redColor].CGColor); CGContextSetFillColorWithColor(context, [UIColor clearColor].CGColor); CGContextDrawImage(context, CGRectMake(0, 0,newImage.size.width,newImage.size.height), newImage.CGImage); CGContextBeginPath(context); CGContextAddLines(context, sPoints,points.count);//添加线 CGContextClosePath(context); //封闭 CGContextDrawPath(context, kCGPathFillStroke); //根据坐标绘制路径 newImage = UIGraphicsGetImageFromCurrentImageContext(); UIGraphicsEndImageContext(); } return newImage; } ``` 效果如下  #####动态人脸矩形检测 要动态来检测,那么我们肯定需要通过相机来实时取出资源,然后再实现,所以我们这里选择了`AVCapture`,关于相机的初始化及使用方法这里就不在累赘了,我们直接上代码 在`AVCaptureVideoDataOutputSampleBufferDelegate`中,通过下面的方法 ``` - (void)captureOutput:(AVCaptureOutput *)output didOutputSampleBuffer:(CMSampleBufferRef)sampleBuffer fromConnection:(AVCaptureConnection *)connection ``` 我们可以进行这么一个转换 ``` CVPixelBufferRef cvpixeBufferRef = CMSampleBufferGetImageBuffer(sampleBuffer); ``` 然后通过 ``` VNImageRequestHandler *handler = [[VNImageRequestHandler alloc] initWithCVPixelBuffer:cvpixeBufferRef options:@{}]; ``` 将相机返回的图片与`request`进行关联了。 后续操作如下 ``` request = [[VNDetectFaceRectanglesRequest alloc] initWithCompletionHandler:^(VNRequest * _Nonnull request, NSError * _Nullable error) { NSLog(@" 打印信息:%lu",request.results.count); NSArray *vnobservations = request.results; dispatch_async(dispatch_get_main_queue(), ^{ //先移除之前的矩形框 [self.rectLayers makeObjectsPerformSelector:@selector(removeFromSuperlayer)]; AVCaptureDevicePosition position = [[self.avInput device] position]; for (VNFaceObservation *faceObservation in vnobservations) { //boundingBox CGRect transFrame = [[GLTools sharedInstance] convertRect:faceObservation.boundingBox imageSize:self.view.frame.size]; //前置摄像头的时候 记得转换 if (position == AVCaptureDevicePositionFront){ transFrame.origin.x = self.view.frame.size.width - transFrame.origin.x - transFrame.size.width; } CALayer *rectLayer = [CALayer layer]; rectLayer.frame = transFrame; rectLayer.borderColor = [UIColor purpleColor].CGColor; rectLayer.borderWidth = 2; [self.view.layer addSublayer:rectLayer]; [self.rectLayers addObject:rectLayer]; } }); }]; ``` 在这里存在一个问题,就是摄像头分为前后摄像头,所以在前置摄像头和后置摄像头切换的时候,需要重新配置下 ``` //需要重新进行配置输出 特别是下面的输出方向 AVCaptureConnection *captureConnection = [self.avOutput connectionWithMediaType:AVMediaTypeVideo]; if ([captureConnection isVideoOrientationSupported]) { [captureConnection setVideoOrientation:AVCaptureVideoOrientationPortrait]; } // 视频稳定设置 if ([captureConnection isVideoStabilizationSupported]) { captureConnection.preferredVideoStabilizationMode = AVCaptureVideoStabilizationModeAuto; } // 设置输出图片方向 captureConnection.videoOrientation = AVCaptureVideoOrientationPortrait; ``` 还有个问题就是在坐标转化的时候,前置摄像头的`x`轴和`UIView`的`x`轴也是相反的,所以这里也需要在进行一次转化 ``` transFrame.origin.x = self.view.frame.size.width - transFrame.origin.x - transFrame.size.width; ``` 效果如下  #####动态添加场景 关于动态添加场景,其实就像我们平时用的美颜相机那样,在适当的位置添加些帽子、眼镜等各种搞笑的图片。这里我们还是需要用到`AVCapture `,并且和动态添加矩形的方法类似,只是在`request`上和处理方式上不一样 下面我们先看代码 ``` request = [[VNDetectFaceLandmarksRequest alloc] initWithCompletionHandler:^(VNRequest * _Nonnull request, NSError * _Nullable error) { NSArray *vnobservations = request.results; for (VNFaceObservation *faceObservation in vnobservations) { VNFaceLandmarks2D *faceLandMarks2D = faceObservation.landmarks; VNFaceLandmarkRegion2D *leftEyefaceLandMarkRegion2D = faceLandMarks2D.leftEye; VNFaceLandmarkRegion2D *rightEyefaceLandMarkRegion2D = faceLandMarks2D.rightEye; dispatch_async(dispatch_get_main_queue(), ^{ // //先移除之前的矩形框 // [self.rectLayers makeObjectsPerformSelector:@selector(removeFromSuperlayer)]; // // AVCaptureDevicePosition position = [[self.avInput device] position]; // // CGRect transFrame = [[GLTools sharedInstance] convertRect:faceObservation.boundingBox imageSize:self.view.frame.size]; // //前置摄像头的时候 记得转换 // if (position == AVCaptureDevicePositionFront){ // transFrame.origin.x = self.view.frame.size.width - transFrame.origin.x - transFrame.size.width; // } // // CALayer *rectLayer = [CALayer layer]; // rectLayer.frame = transFrame; // rectLayer.borderColor = [UIColor purpleColor].CGColor; // rectLayer.borderWidth = 2; // [self.view.layer addSublayer:rectLayer]; // // [self.rectLayers addObject:rectLayer]; AVCaptureDevicePosition position = [[self.avInput device] position]; CGPoint sPoints[leftEyefaceLandMarkRegion2D.pointCount + rightEyefaceLandMarkRegion2D.pointCount]; NSMutableArray *pointXs = [[NSMutableArray alloc] init]; NSMutableArray *pointYs = [[NSMutableArray alloc] init]; for (int i = 0; i < leftEyefaceLandMarkRegion2D.pointCount; i ++) { CGPoint point = leftEyefaceLandMarkRegion2D.normalizedPoints[i]; CGFloat rectWidth = self.view.bounds.size.width * faceObservation.boundingBox.size.width; CGFloat rectHeight = self.view.bounds.size.height * faceObservation.boundingBox.size.height; CGFloat boundingBoxY = self.view.bounds.size.height * (1 - faceObservation.boundingBox.origin.y - faceObservation.boundingBox.size.height); CGPoint p = CGPointZero; if (position == AVCaptureDevicePositionFront){ CGFloat boundingX = self.view.frame.size.width - faceObservation.boundingBox.origin.x * self.view.bounds.size.width - rectWidth; p = CGPointMake(point.x * rectWidth + boundingX, boundingBoxY + (1-point.y) * rectHeight); }else{ p = CGPointMake(point.x * rectWidth + faceObservation.boundingBox.origin.x * self.view.bounds.size.width, boundingBoxY + (1-point.y) * rectHeight); } sPoints[i] = p; [pointXs addObject:[NSNumber numberWithFloat:p.x]]; [pointYs addObject:[NSNumber numberWithFloat:p.y]]; } for (int j = 0; j < rightEyefaceLandMarkRegion2D.pointCount; j ++) { CGPoint point = rightEyefaceLandMarkRegion2D.normalizedPoints[j]; CGFloat rectWidth = self.view.bounds.size.width * faceObservation.boundingBox.size.width; CGFloat rectHeight = self.view.bounds.size.height * faceObservation.boundingBox.size.height; CGFloat boundingBoxY = self.view.bounds.size.height * (1 - faceObservation.boundingBox.origin.y - faceObservation.boundingBox.size.height); CGPoint p = CGPointZero; if (position == AVCaptureDevicePositionFront){ CGFloat boundingX = self.view.frame.size.width - faceObservation.boundingBox.origin.x * self.view.bounds.size.width - rectWidth; p = CGPointMake(point.x * rectWidth + boundingX, boundingBoxY + (1-point.y) * rectHeight); }else{ p = CGPointMake(point.x * rectWidth + faceObservation.boundingBox.origin.x * self.view.bounds.size.width, boundingBoxY + (1-point.y) * rectHeight); } sPoints[leftEyefaceLandMarkRegion2D.pointCount + j] = p; [pointXs addObject:[NSNumber numberWithFloat:p.x]]; [pointYs addObject:[NSNumber numberWithFloat:p.y]]; } // for (UIView *view in self.view.subviews) { // if ([view isKindOfClass:[UIImageView class]]) { // [view removeFromSuperview]; // } // } // // for (int i = 0; i < rightEyefaceLandMarkRegion2D.pointCount + leftEyefaceLandMarkRegion2D.pointCount; i++) { // CGFloat x = sPoints[i].x; // CGFloat y = sPoints[i].y; // UIImageView *view = [[UIImageView alloc] initWithFrame:CGRectMake(x, y, 2, 2)]; // view.backgroundColor = [UIColor redColor]; // [self.view addSubview:view]; // } //排序 得到最小的x和最大的x NSArray *sortPointXs = [pointXs sortedArrayWithOptions:NSSortStable usingComparator: ^NSComparisonResult(id _Nonnull obj1, id _Nonnull obj2) { int value1 = [obj1 floatValue]; int value2 = [obj2 floatValue]; if (value1 > value2) { return NSOrderedDescending; }else if (value1 == value2){ return NSOrderedSame; }else{ return NSOrderedAscending; } }]; NSArray *sortPointYs = [pointYs sortedArrayWithOptions:NSSortStable usingComparator: ^NSComparisonResult(id _Nonnull obj1, id _Nonnull obj2) { int value1 = [obj1 floatValue]; int value2 = [obj2 floatValue]; if (value1 > value2) { return NSOrderedDescending; }else if (value1 == value2){ return NSOrderedSame; }else{ return NSOrderedAscending; } }]; UIImage *image =[UIImage imageNamed:@"eyes"]; CGFloat imageWidth = [sortPointXs.lastObject floatValue] - [sortPointXs.firstObject floatValue] + 40; CGFloat imageHeight = (imageWidth * image.size.height)/image.size.width; self.glassesImageView.frame = CGRectMake([sortPointXs.firstObject floatValue]-20, [sortPointYs.firstObject floatValue]-5, imageWidth, imageHeight); }); } }]; ``` 由于时间关系,代码有点乱,将就将就 先说说思路,我是想动态添加一个眼镜的,所以我必须先得到两个眼睛的位置,然后在计算出两个眼睛的宽高,最后适当的调整眼镜的大小,再动态的添加上去 这里必须要说的一个问题,就是我在实现过程中遇到的---`坐标` 首先是`y`坐标,如果还是按照静态图片的那种获取方式,那么得到的结果将会是完全相反的。 ``` faceObservation.boundingBox.origin.y * image.size.height + point.y * rectHeight ``` 这里我做了 一个假设,估计是由于摄像机成像的原因造成的,所以必须反其道而行,于是我如下改造了下 ``` CGFloat boundingBoxY = self.view.bounds.size.height * (1 - faceObservation.boundingBox.origin.y - faceObservation.boundingBox.size.height); p = CGPointMake(point.x * rectWidth + faceObservation.boundingBox.origin.x * self.view.bounds.size.width, boundingBoxY + (1-point.y) * rectHeight); ``` 从中可以看到,所有的`point.y`都用`1`减去了,这个试验的过程有点恼火,我还没怎么相通,若有知道的,希望可以告诉我下,当然我也会再研究研究。 再说完`y`坐标后,就是`x`坐标了,`x`坐标在`前置摄像头`的时候一切正常,然而在切换成`后置摄像头`的时候,又反了。心累啊,所以没办法,我就只要加判断,然后进行测试,有了如下代码 ``` CGFloat boundingX = self.view.frame.size.width - faceObservation.boundingBox.origin.x * self.view.bounds.size.width - rectWidth; ``` 最后终于大功告成! 效果就是文章最顶的那个效果 #####项目文件截图如下  #####注意 1、在使用过程中,我发现当检测图片的时候内存和`cpu`的消耗还是很高的,比如我的`5s`就成功的崩溃过..... 2、图片方向是有要求的.... ``` - (instancetype)initWithCVPixelBuffer:(CVPixelBufferRef)pixelBuffer options:(NSDictionary<VNImageOption, id> *)options; /*! @brief initWithCVPixelBuffer:options creates a VNImageRequestHandler to be used for performing requests against the image passed in as buffer. @param pixelBuffer A CVPixelBuffer containing the image to be used for performing the requests. The content of the buffer cannot be modified for the lifetime of the VNImageRequestHandler. @param orientation The orientation of the image/buffer based on the EXIF specification. For details see kCGImagePropertyOrientation. The value has to be an integer from 1 to 8. This superceeds every other orientation information. @param options A dictionary with options specifying auxilary information for the buffer/image like VNImageOptionCameraIntrinsics */ - (instancetype)initWithCVPixelBuffer:(CVPixelBufferRef)pixelBuffer orientation:(CGImagePropertyOrientation)orientation options:(NSDictionary<VNImageOption, id> *)options; ``` 通过对比上面两个函数,我们可以发现,多了一个`CGImagePropertyOrientation `类型的参数,没错,这就是指定传入图片的方向,如果指定了方向,而图片方向却不一致,那么恭喜你,检测不出来....这里我用的都是第一个方法,及没有参数,好像默认是`up`的。
本实例支付的费用只是购买源码的费用,如有疑问欢迎在文末留言交流,如需作者在线代码指导、定制等,在作者开启付费服务后,可以点击“购买服务”进行实时联系,请知悉,谢谢
感谢
9
手机上随时阅读、收藏该文章 ?请扫下方二维码
相似例子推荐
评论
作者
敷衍丶尘世
16
例子数量
616
帮助
43
感谢
评分详细
可运行:
4.5
分
代码质量:
4.5
分
文章描述详细:
4.5
分
代码注释:
4.5
分
综合:
4.5
分
作者例子
iOS 仿支付宝密码支付
iOS 九宫格手势密码
iOS CAReplicatorLayer 简单动画
iOS 之UIBezierPath
iOS 核心动画 Core Animation浅谈
iOS CoreImage之滤镜简单使用
iOS UIButton文字和图片间距随意调整
iOS 简单引导界面
iOS 两种不同的图片无限轮播
iOSQuart2D绘图之UIImage简单使用
iOS 自定义键盘
iOS 自定义转场动画浅谈
iOS Core ML与Vision初识
iOS 11之Vision人脸检测
iOS之基于FreeStreamer的简单音乐播放器(模仿QQ音乐)
iOS 音频视频图像合成那点事