你的浏览器禁用了JavaScript, 请开启后刷新浏览器获得更好的体验!
首页
热门
推荐
精选
登录
|
注册
iOS 自定义转场动画浅谈
立即下载
用AI写一个
该例子支持:好用才打赏哦
现在下载学习
发布时间:2017-09-07
207人
|
浏览:9570次
|
收藏
|
分享
技术:ios
运行环境:ios8+
概述
说到转场动画,其实无非就是我们常用的push pop present dismiss四种动画,其中前面两个是成对使用,后面两个成对使用
详细
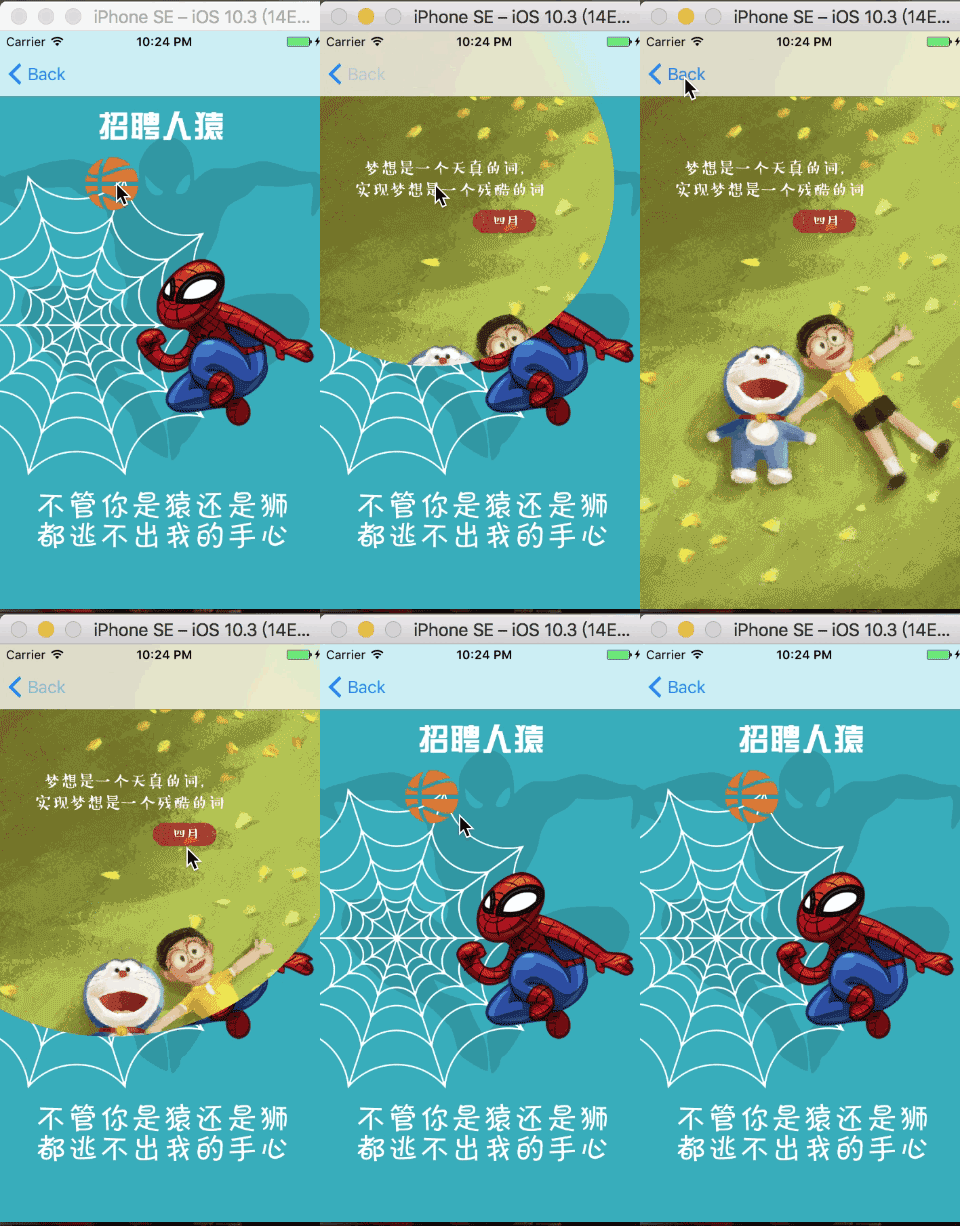
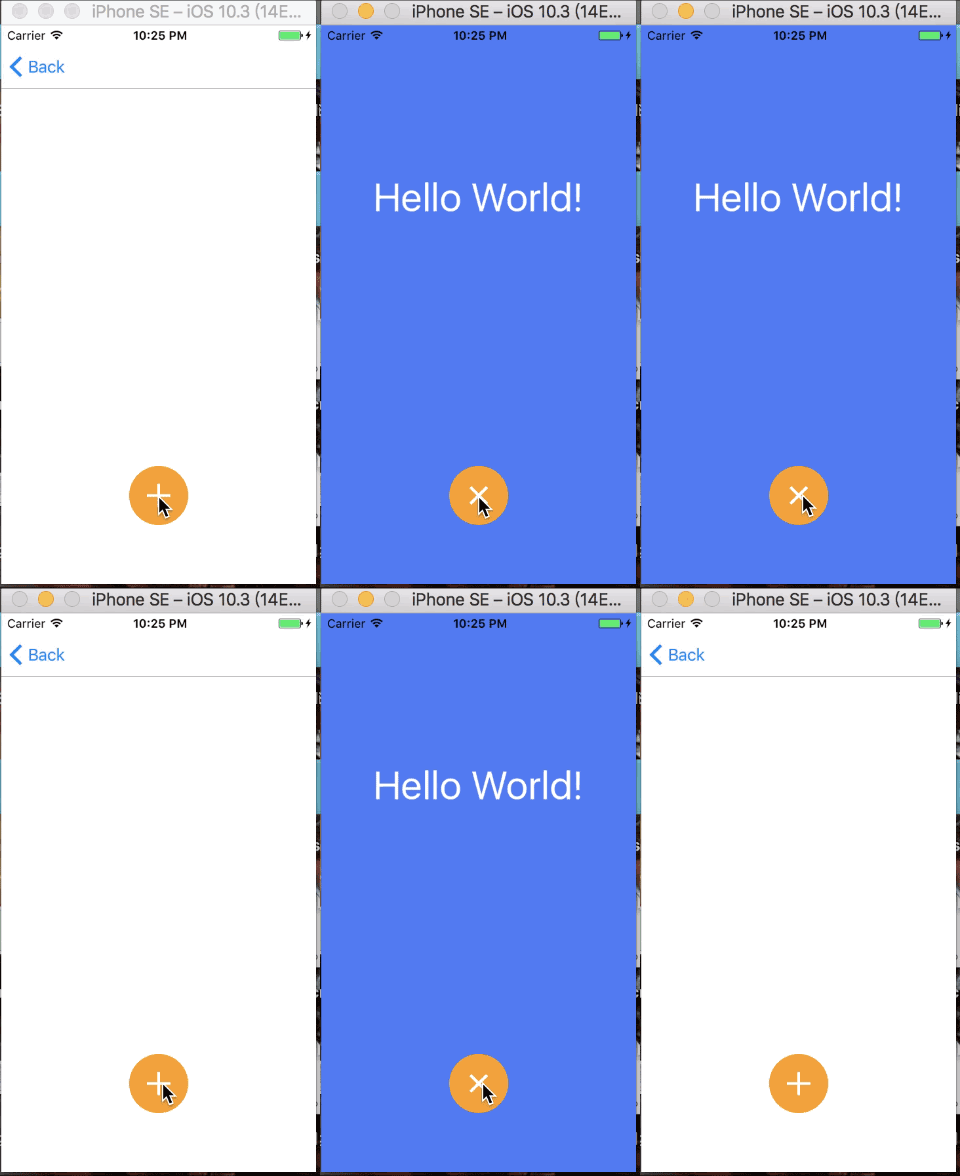
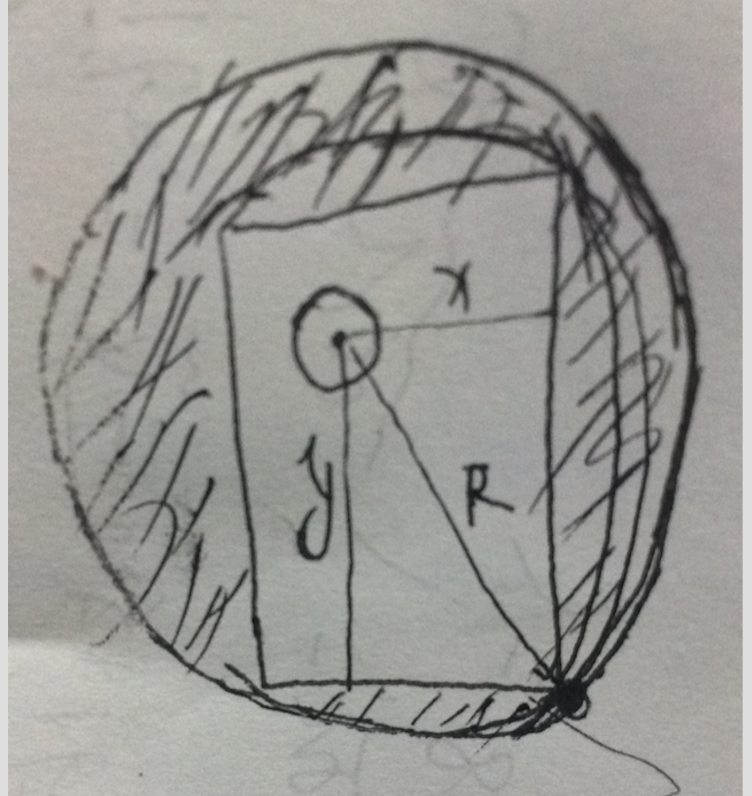
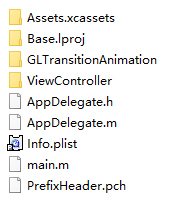
> 路漫漫其修远兮,吾将上下而求索  #### 前记 想研究自定义转场动画很久了,时间就像海绵,挤一挤还是有的,花了差不多有10天的时间,终于对转场动画了解了一点。自从`iOS 7`以后,我们就可以自定义转场动画,实现我们想要的效果,在这之前,我们先来看一张图,大概了解下,需要知道些什么 `相关类联系图`  相信各位看官也差不多看完这张图了,下面我们就来简单了解下其中的类和相关的函数 说到转场动画,其实无非就是我们常用的`push` `pop` `present` `dismiss`四种动画,其中前面两个是成对使用,后面两个成对使用,我们先看看`push`这组在自定义转场动画中所涉及到的类 由于`push`动画组需要配合`navigationController`来使用,所以上图中的`UINavigationControllerDelegate`肯定是我们需要的类 ##### UINavigationControllerDelegate 先来看看其中需要用到的函数 ``` - (nullable id <UIViewControllerInteractiveTransitioning>)navigationController:(UINavigationController *)navigationController interactionControllerForAnimationController:(id <UIViewControllerAnimatedTransitioning>) animationController NS_AVAILABLE_IOS(7_0); - (nullable id <UIViewControllerAnimatedTransitioning>)navigationController:(UINavigationController *)navigationController animationControllerForOperation:(UINavigationControllerOperation)operation fromViewController:(UIViewController *)fromVC toViewController:(UIViewController *)toVC NS_AVAILABLE_IOS(7_0); ``` 第一个函数的返回值是一个`id <UIViewControllerInteractiveTransitioning>`值 第二个函数返回的值是一个`id <UIViewControllerAnimatedTransitioning>`值 那么我们就先从这两个返回值入手,来看下两个函数的作用 ##### UIViewControllerInteractiveTransitioning 、UIPercentDrivenInteractiveTransition 这两个类又是干什么的呢?`UIPercentDrivenInteractiveTransition`遵守协议`UIViewControllerInteractiveTransitioning`,通过查阅资料了解到,`UIPercentDrivenInteractiveTransition`这个类的对象会根据我们的手势,来决定我们的自定义过渡的完成度,也就是这两个其实是和手势交互相关联的,自然而然我们就想到了`iOS 7`引进的侧滑手势,对,就是侧滑手势,说到这里,我就顺带介绍一个类,`UIScreenEdgePanGestureRecognizer`,手势侧滑的类,具体怎么使用,后面我会陆续讲到。 涉及函数 ``` //更新进度 - (void)updateInteractiveTransition:(CGFloat)percentComplete; //取消转场 回到转场前的效果 - (void)cancelInteractiveTransition; //完成转场 - (void)finishInteractiveTransition; ``` ##### UIViewControllerAnimatedTransitioning 在这个类中,我们又看到了两个函数 ``` //转场时间 - (NSTimeInterval)transitionDuration:(nullable id <UIViewControllerContextTransitioning>)transitionContext; - (void)animateTransition:(id <UIViewControllerContextTransitioning>)transitionContext; ``` 其中又涉及到一个新的类`UIViewControllerContextTransitioning`,那么这个又是干什么的呢?我们等下再来了解,先来谈谈第一个函数`transitionDuration`,从返回值我们可以猜测出这是和时间有关的,没错,这就是我们自定义转场动画所需要的时间 那么下面我们就来看看`UIViewControllerContextTransitioning` ##### UIViewControllerContextTransitioning 这个类就是我们自定义转场动画所需要的核心,即转场动画的上下文,定义了转场时需要的元素,比如在转场过程中所参与的视图控制器和视图的相关属性 ``` //转场动画的容器 @property(nonatomic, readonly) UIView *containerView; //通过对应的`key`可以得到我们需要的`vc` - (UIViewController *)viewControllerForKey:(UITransitionContextViewControllerKey)key //转场动画完成时候调用,必须调用,否则在进行其他转场没有任何效果 - (void)completeTransition:(BOOL)didComplete ``` 看到这里,我们现在再去看`UINavigationControllerDelegate `中的两个函数和`UIViewControllerAnimatedTransitioning `中的`animateTransition `函数,就能完全理解了 ``` //主要用于手势交互转场 for push or pop - (nullable id <UIViewControllerInteractiveTransitioning>)navigationController:(UINavigationController *)navigationController interactionControllerForAnimationController:(id <UIViewControllerAnimatedTransitioning>) animationController NS_AVAILABLE_IOS(7_0); //非手势交互转场 for push or pop - (nullable id <UIViewControllerAnimatedTransitioning>)navigationController:(UINavigationController *)navigationController animationControllerForOperation:(UINavigationControllerOperation)operation fromViewController:(UIViewController *)fromVC toViewController:(UIViewController *)toVC NS_AVAILABLE_IOS(7_0); //实现转场动画 通过transitionContext - (void)animateTransition:(id <UIViewControllerContextTransitioning>)transitionContext; ``` 到此,我们还有一个类没有了解,那就是`UIViewControllerTransitioningDelegate`有了前面的分析,我们可以很好的理解 ##### UIViewControllerTransitioningDelegate 主要是针对`present`和`dismiss`动画的转场 ``` //非手势转场交互 for present - (id<UIViewControllerAnimatedTransitioning>)animationControllerForPresentedController:(UIViewController *)presented presentingController:(UIViewController *)presenting sourceController:(UIViewController *)source //非手势转场交互 for dismiss - (id<UIViewControllerAnimatedTransitioning>)animationControllerForDismissedController:(UIViewController *)dismissed //手势交互 for dismiss - (id<UIViewControllerInteractiveTransitioning>)interactionControllerForDismissal:(id<UIViewControllerAnimatedTransitioning>)animator //手势交互 for present - (id<UIViewControllerInteractiveTransitioning>)interactionControllerForPresentation:(id<UIViewControllerAnimatedTransitioning>)animator ``` 基本定义和概览我们差不多应该有了一定的了解,正如上图中的简单描述。 了解性的东西说了这么多,下面我们就来点实际性的东西,除了第一张开门那种自定义动画,再来几个比较常用的动画    这些动画都比较简单,相信许多大神都很清楚,还望见谅,下面我就对每一种进行分析分析,在分析动画之前,先来看看怎么将上面的各个类进行封装起来,使用更方便,这里不得不感谢很久之前看到的一篇文章,从他的[文章](http://www.cocoachina.com/ios/20160629/16856.html)中收获非常大。 在学习转场动画的时候,虽然对所有类的关系有了一定了解,但是封装的时候,完全没有想到还有这么好的思路,确实是学习了。下面我们就一起来看看封装思路。 #### 封装思路 ##### 1. 新建一个综合管理转场动画的类 作用:主要是管理转场所需要的一些设置,诸如转场时间和转场的实现(主要是在子类中进行实现,分离开来),用户在自定义转场动画的时候,只需要继承该类并重写父类方法就可以 类名:`GLTransitionManager`,需要准守的协议有`<UINavigationControllerDelegate,UIViewControllerTransitioningDelegate>` 通过这样,就可以将`present`和`push`动画相关的操作在该类中进行管理 `GLTransitionManager.h`中具体方法 ``` @interface GLTransitionManager : NSObject<UINavigationControllerDelegate,UIViewControllerTransitioningDelegate> /** 转场动画的时间 默认为0.5s */ @property (nonatomic,assign) NSTimeInterval duration; /** 入场动画 @param contextTransition 实现动画 */ - (void)setToAnimation:(id<UIViewControllerContextTransitioning>)contextTransition; /** 退场动画 @param contextTransition 实现动画 */ - (void)setBackAnimation:(id<UIViewControllerContextTransitioning>)contextTransition; ``` 相信大家也看到了在入场和退场动画中都有`(id<UIViewControllerContextTransitioning>) contextTransition `这么一个参数,通过该参数,我们可以获取转场动画的相关`vc`和其他信息,进行转场动画的实现,即我们在自定义转场动画的时候,只需要重写该两个方法就可以,通过`contextTransition`来实现动画,而`<UIViewControllerContextTransitioning>`又在`UIViewControllerAnimatedTransitioning`协议的方法`- (void)animateTransition:(id <UIViewControllerContextTransitioning>)transitionContext`中涉及到,于是我又新建了一个准守协议`UIViewControllerAnimatedTransitioning`的类`GLTransitionAnimation`,也就是下面我们将的类 ##### 2.转场动画配置及实现类 作用:虽然是配置和实现类,但是在该类中并没有进行实现,这里也正是之前那个博主的高明之处,至少我是这么认为的。在该类中,我们用`block`的传值方法将其传入到我们的管理类中,也就是`GLTransitionManager ` `GLTransitionAnimation.h`文件 ``` /** GLTransitionAnimation 块 @param contextTransition 将满足UIViewControllerContextTransitioning协议的对象传到管理内 在管理类对动画统一实现 */ typedef void(^GLTransitionAnimationBlock)(id <UIViewControllerContextTransitioning> contextTransition); @interface GLTransitionAnimation : NSObject<UIViewControllerAnimatedTransitioning> @property (nonatomic,copy) GLTransitionAnimationBlock animationBlock; /** 初始化方法 @param duration 转场时间 @return 返回 */ - (id)initWithDuration:(NSTimeInterval)duration; ``` `GLTransitionAnimation.m`文件比较简单,这里就先不详说,我们先回到管理类中,来看看怎么使用 `GLTransitionManager.m`文件, 在此种定义两个属性 ``` /** 入场动画 */ @property (nonatomic,strong) GLTransitionAnimation *toTransitionAnimation; /** 退场动画 */ @property (nonatomic,strong) GLTransitionAnimation *backTransitionAnimation; ``` 实现方法 ``` #pragma mark == 懒加载 - (GLTransitionAnimation *)toTransitionAnimation { if (nil == _toTransitionAnimation) { __weak typeof(self) weakSelf = self; _toTransitionAnimation = [[GLTransitionAnimation alloc] initWithDuration:self.duration ]; _toTransitionAnimation.animationBlock = ^(id<UIViewControllerContextTransitioning> contextTransition) { [weakSelf setToAnimation:contextTransition]; }; } return _toTransitionAnimation; } - (GLTransitionAnimation *)backTransitionAnimation { if (nil == _backTransitionAnimation) { __weak typeof(self) weakSelf = self; _backTransitionAnimation = [[GLTransitionAnimation alloc] initWithDuration:self.duration]; _backTransitionAnimation.animationBlock = ^(id<UIViewControllerContextTransitioning> contextTransition) { [weakSelf setBackAnimation:contextTransition]; }; } return _backTransitionAnimation; } ``` 通过上面这一方法,我们就很好的将关键参数和对外接口联系起来了。这样我们就只需要在`setToAnimation`和`setBackAnimation`进行转场动画的具体实现即可。 当然这里还有一个小问题,相信各位也发现了,就是为什么将属性定义在了`.m`文件里呢?是的,这里确实是定义在了`.m`文件中,其实就是为了更少的暴露不需要的。 搞定这个之后,我们在来看看,在上面时候,调用该属性呢? 下面我们就来看具体使用的地方 ``` //非手势转场交互 for present - (id<UIViewControllerAnimatedTransitioning>)animationControllerForPresentedController:(UIViewController *)presented presentingController:(UIViewController *)presenting sourceController:(UIViewController *)source{ return self.toTransitionAnimation; } //非手势转场交互 for dismiss - (id<UIViewControllerAnimatedTransitioning>)animationControllerForDismissedController:(UIViewController *)dismissed{ return self.backTransitionAnimation; } //================ //非手势转场交互 for push or pop /*****注释:通过 fromVC 和 toVC 我们可以在此设置需要自定义动画的类 *****/ - (id <UIViewControllerAnimatedTransitioning>)navigationController:(UINavigationController *)navigationController animationControllerForOperation:(UINavigationControllerOperation)operation fromViewController:(UIViewController *)fromVC toViewController:(UIViewController *)toVC { _operation = operation; if (operation == UINavigationControllerOperationPush) { return self.toTransitionAnimation; } else if (operation == UINavigationControllerOperationPop) { return self.backTransitionAnimation; } else { return nil; } } ``` 在这两个地方使用后,我们差不多就完成了一半了,那还一部分呢?那就是我们的手势滑动,下面我们就来看看手势滑动。 ##### 3.手势交互管理类 作用:主要通过侧滑手势来管理交互,在iOS 7后引入新的类`UIPercentDrivenInteractiveTransition`,该类的对象会根据我们的手势,来决定我们的自定义过渡的完成度,所以此次我采用继承的方式,然后在继承的类中加入滑动手势类,这里加入的是侧滑手势类`UIScreenEdgePanGestureRecognizer`,这个类也就是我定义的`GLInteractiveTransition`类 `GLInteractiveTransition.h`文件 ``` /** 手势的方向枚举 - GLPanEdgeTop:屏幕上方 - GLPanEdgeLeft:屏幕左侧 - GLPanEdgeBottom: 屏幕下方 - GLPanEdgeRight: 屏幕右方 */ typedef NS_ENUM(NSInteger,GLEdgePanGestureDirection) { GLPanEdgeTop = 0, GLPanEdgeLeft, GLPanEdgeBottom, GLPanEdgeRight }; ///** // 手势转场类型 // // - GLInteractiveTransitionPush: push // - GLInteractiveTransitionPop: pop // - GLInteractiveTransitionPresent: present // - GLInteractiveTransitionDismiss: dismiss // */ //typedef NS_ENUM(NSInteger,GLInteractiveTransitionType) { // GLInteractiveTransitionPush = 0, // GLInteractiveTransitionPop, // GLInteractiveTransitionPresent , // GLInteractiveTransitionDismiss //}; @interface GLInteractiveTransition : UIPercentDrivenInteractiveTransition /** 是否满足侧滑手势交互 */ @property (nonatomic,assign) BOOL isPanGestureInteration; /** 转场时的操作 不用传参数的block */ @property (nonatomic,copy) dispatch_block_t eventBlcok; /** 添加侧滑手势 @param view 添加手势的view @param direction 手势的方向 */ - (void)addEdgePageGestureWithView:(UIView *)view direction:(GLEdgePanGestureDirection)direction; ``` 在`.h`文件中,定义了两个属性,一个是用来判断是否需满足侧滑手势,这个在后面会讲到。另一个是用来在侧滑的时候执行所需要的转场的`block`,之前本来是没有加这个的,但是在后面使用的时候,由于想加侧滑的`present`和`push`效果,所以就加了一个。 下面看看`.m`文件滑动手势中的具体实现 ``` - (void)handlePopRecognizer:(UIPanGestureRecognizer*)recognizer { // 计算用户手指划了多远 CGFloat progress = fabs([recognizer translationInView:self.gestureView].x) / (self.gestureView.bounds.size.width * 1.0); progress = MIN(1.0, MAX(0.0, progress)); switch (recognizer.state) { case UIGestureRecognizerStateBegan: { _isPanGestureInteration = YES; if (self.eventBlcok) { self.eventBlcok(); } // 创建过渡对象,弹出viewController // // UIViewController *fromVc = [self gl_viewController]; // // switch (self.transitionType) { // case GLInteractiveTransitionPush: // { // // } // break; // case GLInteractiveTransitionPop: // { // if (fromVc.navigationController) { // [fromVc.navigationController popViewControllerAnimated:YES]; // } // } // break; // case GLInteractiveTransitionPresent: // { // // } // break; // case GLInteractiveTransitionDismiss: // { // [fromVc dismissViewControllerAnimated:YES completion:nil]; // } // break; // default: // break; // } break; } case UIGestureRecognizerStateChanged: { // 更新 interactive transition 的进度 [self updateInteractiveTransition:progress]; break; } case UIGestureRecognizerStateEnded: case UIGestureRecognizerStateCancelled: { // NSLog(@" 打印信息:%f",progress); // 完成或者取消过渡 if (progress > 0.5) { [self finishInteractiveTransition]; } else { [self cancelInteractiveTransition]; } _isPanGestureInteration = NO; break; } default: break; } } ``` 手势交互管理类的核心代码差不多就这么多,下面我们看看怎么使用 ##### 4.`UIViewController + GLTransition` 为了和系统的转场动画的函数区分开来,这里我新建了一个`UIViewController`的`category`类`UIViewController + GLTransition`,在其中定义了四个函数,分别如下 ``` /** push动画 @param viewController 被push viewController @param transitionManager 控制类 */ - (void)gl_pushViewControler:(UIViewController *)viewController withAnimation:(GLTransitionManager*)transitionManager; /** present动画 @param viewController 被present viewController @param transitionManager 控制类 */ - (void)gl_presentViewControler:(UIViewController *)viewController withAnimation:(GLTransitionManager*)transitionManager; /** 注册入场手势 @param direction 方向 @param blcok 手势转场触发的点击事件 */ - (void)gl_registerToInteractiveTransitionWithDirection:(GLEdgePanGestureDirection)direction eventBlcok:(dispatch_block_t)blcok; /** 注册返回手势 @param direction 侧滑方向 @param blcok 手势转场触发的点击事件 */ - (void)gl_registerBackInteractiveTransitionWithDirection:(GLEdgePanGestureDirection)direction eventBlcok:(dispatch_block_t)blcok; ``` 下面我们看看具体实现 `UIViewController (GLTransition).m`文件 ``` - (void)gl_pushViewControler:(UIViewController *)viewController withAnimation:(GLTransitionManager *)transitionManager { if (!viewController) { return; } if (!transitionManager) { return; } if (self.navigationController) { self.navigationController.delegate = transitionManager; GLInteractiveTransition *toInteractiveTransition = objc_getAssociatedObject(self, &kToAnimationKey); if (toInteractiveTransition) { [transitionManager setValue:toInteractiveTransition forKey:@"toInteractiveTransition"]; } objc_setAssociatedObject(viewController, &kAnimationKey, transitionManager, OBJC_ASSOCIATION_RETAIN_NONATOMIC); [self.navigationController pushViewController:viewController animated:YES]; } } - (void)gl_presentViewControler:(UIViewController *)viewController withAnimation:(GLTransitionManager *)transitionManager { if (!viewController) { return; } if (!transitionManager) { return; } //present 动画代理 被执行动画的vc设置代理 viewController.transitioningDelegate = transitionManager; GLInteractiveTransition *toInteractiveTransition = objc_getAssociatedObject(self, &kToAnimationKey); if (toInteractiveTransition) { [transitionManager setValue:toInteractiveTransition forKey:@"toInteractiveTransition"]; } objc_setAssociatedObject(viewController, &kAnimationKey, transitionManager, OBJC_ASSOCIATION_RETAIN_NONATOMIC); [self presentViewController:viewController animated:YES completion:nil]; } - (void)gl_registerToInteractiveTransitionWithDirection:(GLEdgePanGestureDirection)direction eventBlcok:(dispatch_block_t)blcok { GLInteractiveTransition *interactiveTransition = [[GLInteractiveTransition alloc] init]; interactiveTransition.eventBlcok = blcok; [interactiveTransition addEdgePageGestureWithView:self.view direction:direction]; objc_setAssociatedObject(self, &kToAnimationKey, interactiveTransition, OBJC_ASSOCIATION_RETAIN_NONATOMIC); } - (void)gl_registerBackInteractiveTransitionWithDirection:(GLEdgePanGestureDirection)direction eventBlcok:(dispatch_block_t)blcok { GLInteractiveTransition *interactiveTransition = [[GLInteractiveTransition alloc] init]; interactiveTransition.eventBlcok = blcok; [interactiveTransition addEdgePageGestureWithView:self.view direction:direction]; //判读是否需要返回 然后添加侧滑 GLTransitionManager *animator = objc_getAssociatedObject(self, &kAnimationKey); if (animator) { //用kvc的模式 给 animator的backInteractiveTransition 退场赋值 [animator setValue:interactiveTransition forKey:@"backInteractiveTransition"]; } } ``` 在`push`和`present`中,有几个需要注意的地方 1、`self.navigationController.delegate = transitionManager` 2、`viewController.transitioningDelegate = transitionManager` 上面两个主要是将`navigationController`的代理和`viewController`的`transitioningDelegate`指向对象`transitionManager`,这个对象是准守了`<UINavigationControllerDelegate,UIViewControllerTransitioningDelegate>`两个协议的,这样我们就能够在`push`和`present`的时候,简单的去调协议方法。 3、设置手势交互转场 ``` GLInteractiveTransition *toInteractiveTransition = objc_getAssociatedObject(self, &kToAnimationKey); if (toInteractiveTransition) { [transitionManager setValue:toInteractiveTransition forKey:@"toInteractiveTransition"]; } ``` 在`push`和`present`方法中,都有这样的代码,这里为了减少不必要的暴露,在`GLTransitionManager.m`文件中,我还定义了两个属性 ``` /** 入场手势 */ @property (nonatomic,strong) GLInteractiveTransition *toInteractiveTransition; /** 退场手势 */ @property (nonatomic,strong) GLInteractiveTransition *backInteractiveTransition; ``` 并且通过`kvc`的方式对其进行赋值,当转场动画进行的时候,会先去调用非转场动画的方法,比如`push`的时候,会先调用 ``` - (id <UIViewControllerAnimatedTransitioning>)navigationController:(UINavigationController *)navigationController animationControllerForOperation:(UINavigationControllerOperation)operation fromViewController:(UIViewController *)fromVC toViewController:(UIViewController *)toVC ``` 然后再调用手势交互 ``` //手势交互 for push or pop - (id<UIViewControllerInteractiveTransitioning>)navigationController:(UINavigationController *)navigationController interactionControllerForAnimationController:(id<UIViewControllerAnimatedTransitioning>)animationController ``` 这个时候,我们就需要加一个判断,也就是通过`GLInteractiveTransition`类中的是否满足侧滑手势交互`isPanGestureInteration`这个属性来判断,前面在侧滑手势刚刚进行的时候,就对其进行了赋值,并设置为`yes`,对应的实现代码就是 ``` - (id<UIViewControllerInteractiveTransitioning>)navigationController:(UINavigationController *)navigationController interactionControllerForAnimationController:(id<UIViewControllerAnimatedTransitioning>)animationController { if (_operation == UINavigationControllerOperationPush) { return self.toInteractiveTransition.isPanGestureInteration ? self.toInteractiveTransition:nil; } else{ return self.backInteractiveTransition.isPanGestureInteration ? self.backInteractiveTransition:nil; } } ``` 如果返回的为`nil`,那么就不会去调用手势交互类,否则则会调用。同理,`present`的时候也是一样 所以就有了下面的代码 ``` //手势交互 for dismiss - (id<UIViewControllerInteractiveTransitioning>)interactionControllerForDismissal:(id<UIViewControllerAnimatedTransitioning>)animator{ return self.backInteractiveTransition.isPanGestureInteration ? self.backInteractiveTransition:nil; } //手势交互 for present - (id<UIViewControllerInteractiveTransitioning>)interactionControllerForPresentation:(id<UIViewControllerAnimatedTransitioning>)animator{ return self.toInteractiveTransition.isPanGestureInteration ? self.toInteractiveTransition:nil; } ``` 在`UIViewController + GLTransition`中的`push`和`present`函数中,还有一个需要注意的地方,那就是 ``` objc_setAssociatedObject(viewController, &kAnimationKey, transitionManager, OBJC_ASSOCIATION_RETAIN_NONATOMIC); ``` 这里通过`runtime`的方式给`vc`设置了一个属性值,为什么这么做呢?因为在`arc`下,如果我们在使用`GLTransitionManager`的时候去创建一个对象而非`vc`的属性,那么在`push`的时候`GLTransitionManager`这个对象就会被系统释放掉,这样我们后面所有有关转场的操作就不能再实现了,或许我们可以给`vc`建一个`base`类,然后添加一个`GLTransitionManager`对象的属性,但是这样或许有点复杂,所有这里就这样处理了。 在`UIViewController + GLTransition`中还有两个函数的实现,其原理,我相信大家应该都能看明白了,就不再详细说明了 ``` - (void)gl_registerToInteractiveTransitionWithDirection:(GLEdgePanGestureDirection)direction eventBlcok:(dispatch_block_t)blcok { GLInteractiveTransition *interactiveTransition = [[GLInteractiveTransition alloc] init]; interactiveTransition.eventBlcok = blcok; [interactiveTransition addEdgePageGestureWithView:self.view direction:direction]; objc_setAssociatedObject(self, &kToAnimationKey, interactiveTransition, OBJC_ASSOCIATION_RETAIN_NONATOMIC); } - (void)gl_registerBackInteractiveTransitionWithDirection:(GLEdgePanGestureDirection)direction eventBlcok:(dispatch_block_t)blcok { GLInteractiveTransition *interactiveTransition = [[GLInteractiveTransition alloc] init]; interactiveTransition.eventBlcok = blcok; [interactiveTransition addEdgePageGestureWithView:self.view direction:direction]; //判读是否需要返回 然后添加侧滑 GLTransitionManager *animator = objc_getAssociatedObject(self, &kAnimationKey); if (animator) { //用kvc的模式 给 animator的backInteractiveTransition 退场赋值 [animator setValue:interactiveTransition forKey:@"backInteractiveTransition"]; } } ``` 整个封装的思路差不多到这里就完了,希望对大家有用 文章有点长,希望大家能够理解,因为后面还有。。。。 #### 几个动画的具体实现 ##### 1、开门动画 由于我们已经有了基类``,所以当我们需要实现什么动画的时候,只需要集成该类就可以了 针对开门动画我新建了下面这么一个类`GLTransitionManager` ``` @interface GLOpenDoorAnimation : GLTransitionManager @end ``` 然后在重新父类的方法 ``` - (void)setToAnimation:(id<UIViewControllerContextTransitioning>)contextTransition ``` 具体实现 1、根据`id<UIViewControllerContextTransitioning>`对象先得到几个关键值,目标`vc`和当前`vc`和容器`containerView` ``` //获取目标动画的VC UIViewController *toVc = [contextTransition viewControllerForKey:UITransitionContextToViewControllerKey]; UIViewController *fromVc = [contextTransition viewControllerForKey:UITransitionContextFromViewControllerKey]; UIView *containerView = [contextTransition containerView]; ``` 2、由于是开门动画,所以其过程大概是这样的:当前`vc`逐渐缩小,目标`vc`慢慢从屏幕两边移到中间,但是我们又不能把目标`vc`的`view`分成两个部分,所以这里我们可以利用截图,来给用户造成一个假象。先截两个图,然后分别让其坐标居于屏幕外,然后用动画让其慢慢移动到屏幕中间,动画完成的时候,移除当前两个截图。这里有个小问题,那就是当前`vc`的缩放,虽然我们能够使其缩小,但是这样,如果涉及到侧滑手势的话,问题就来了。因为`view`的宽发生了变化,这样我们根据宽度来计算滑动的距离,从而更新转场动画的时候就会出现问题,导致 ``` - (void)handlePopRecognizer:(UIPanGestureRecognizer*)recognizer { // 计算用户手指划了多远 CGFloat progress = fabs([recognizer translationInView:self.gestureView].x) / (self.gestureView.bounds.size.width * 1.0); progress = MIN(1.0, MAX(0.0, progress)); ``` 中的`progress `出现问题。所以这里也就采用了截图的方式,对该截图进行缩放,而不去修改`vc`的`view`。 下面看下核心代码 ``` - (void)setToAnimation:(id<UIViewControllerContextTransitioning>)contextTransition { //获取目标动画的VC UIViewController *toVc = [contextTransition viewControllerForKey:UITransitionContextToViewControllerKey]; UIViewController *fromVc = [contextTransition viewControllerForKey:UITransitionContextFromViewControllerKey]; UIView *containerView = [contextTransition containerView]; UIView *fromView = fromVc.view; UIView *toView = toVc.view; //截图 UIView *toView_snapView = [toView snapshotViewAfterScreenUpdates:YES]; CGRect left_frame = CGRectMake(0, 0, CGRectGetWidth(fromView.frame) / 2.0, CGRectGetHeight(fromView.frame)); CGRect right_frame = CGRectMake(CGRectGetWidth(fromView.frame) / 2.0, 0, CGRectGetWidth(fromView.frame) / 2.0, CGRectGetHeight(fromView.frame)); UIView *from_left_snapView = [fromView resizableSnapshotViewFromRect:left_frame afterScreenUpdates:NO withCapInsets:UIEdgeInsetsZero]; UIView *from_right_snapView = [fromView resizableSnapshotViewFromRect:right_frame afterScreenUpdates:NO withCapInsets:UIEdgeInsetsZero]; toView_snapView.layer.transform = CATransform3DMakeScale(0.7, 0.7, 1); from_left_snapView.frame = left_frame; from_right_snapView.frame = right_frame; //将截图添加到 containerView 上 [containerView addSubview:toView_snapView]; [containerView addSubview:from_left_snapView]; [containerView addSubview:from_right_snapView]; fromView.hidden = YES; [UIView animateWithDuration:self.duration delay:0 options:UIViewAnimationOptionCurveEaseOut animations:^{ //左移 from_left_snapView.frame = CGRectOffset(from_left_snapView.frame, -from_left_snapView.frame.size.width, 0); //右移 from_right_snapView.frame = CGRectOffset(from_right_snapView.frame, from_right_snapView.frame.size.width, 0); toView_snapView.layer.transform = CATransform3DIdentity; } completion:^(BOOL finished) { fromView.hidden = NO; [from_left_snapView removeFromSuperview]; [from_right_snapView removeFromSuperview]; [toView_snapView removeFromSuperview]; if ([contextTransition transitionWasCancelled]) { [containerView addSubview:fromView]; } else { [containerView addSubview:toView]; } [contextTransition completeTransition:![contextTransition transitionWasCancelled]]; }]; } ``` `setBackAnimation`动画和上面的大同小异,就不再详细说明,文章后面有`demo`地址,大家可以看看。 ##### 2、圆圈逐渐放大转场动画 在做动画之前,我们先要了解其大概原理 这里我简单的做了个草图  小圆和大圆分别表示动画前和动画后 这里我们采用的是`UIBezierPath + mask + CAShapeLayer`的策略对其进行实习 大家都知道,`UIBezierPath`可以画圆形,而`CAShapeLayer`又具备`CGPathRef path`属性,可以和`UIBezierPath`联系起来,而`UIView`又具备`CALayer *mask`属性,这样三者就这么巧妙的联系起来了。 在这里,我们使用`CABasicAnimation`动画,通过对其设置`[CABasicAnimation animationWithKeyPath:@"path"]`来让其执行我们想要的`path`路径动画 于是就有了下面的代码 ``` - (void)setToAnimation:(id<UIViewControllerContextTransitioning>)contextTransition { //获取目标动画的VC UIViewController *toVc = [contextTransition viewControllerForKey:UITransitionContextToViewControllerKey]; UIView *containerView = [contextTransition containerView]; [containerView addSubview:toVc.view]; //创建UIBezierPath路径 作为后面动画的起始路径 UIBezierPath *startPath = [UIBezierPath bezierPathWithArcCenter:self.centerPoint radius:self.radius startAngle:0 endAngle:2*M_PI clockwise:YES]; //创建结束UIBezierPath //首先我们需要得到后面路径的半径 半径应该是距四个角最远的距离 CGFloat x = self.centerPoint.x; CGFloat y = self.centerPoint.y; //取出其中距屏幕最远的距离 来求围城矩形的对角线 即我们所需要的半径 CGFloat radius_x = MAX(x, containerView.frame.size.width - x); CGFloat radius_y = MAX(y, containerView.frame.size.height - y); //补充下 sqrtf求平方根 double pow(double x, double y); 求 x 的 y 次幂(次方) //通过勾股定理算出半径 CGFloat endRadius = sqrtf(pow(radius_x, 2) + pow(radius_y, 2)); UIBezierPath *endPath = [UIBezierPath bezierPathWithArcCenter:self.centerPoint radius:endRadius startAngle:0 endAngle:2*M_PI clockwise:YES]; // self.endPath = endPath; //创建CAShapeLayer 用以后面的动画 CAShapeLayer *shapeLayer = [CAShapeLayer layer]; shapeLayer.path = endPath.CGPath; toVc.view.layer.mask = shapeLayer; CABasicAnimation *animation = [CABasicAnimation animationWithKeyPath:@"path"]; animation.fromValue = (__bridge id _Nullable)(startPath.CGPath); animation.duration = self.duration; animation.delegate = (id)self; // animation.removedOnCompletion = NO;//执行后移除动画 //保存contextTransition 后面动画结束的时候调用 [animation setValue:contextTransition forKey:@"pathContextTransition"]; [shapeLayer addAnimation:animation forKey:nil]; self.maskShapeLayer = shapeLayer; } ``` 由于代码中有比较详细的说明,所以这里就不再详细说明,`setBackAnimation`也大同小异 ##### 3、圆圈和目标vc共同缩放转场动画 这个比较简单,主要是利用`UIView`的缩放进行的,由于目标`vc`的上角和圆是相切的,所以,这里我们可以先假设目标`vc`处于正常状态,然后再跟进小圆的中心,画一个大圆,让其和目标`vc`一起缩放就是。这里留了一个缺陷,那就是不支持侧滑,因为我是用目标`vc`进行缩放的,而没有截图,大家可以试试。 其实现大概为 ``` - (CGRect)frameToCircle:(CGPoint)centerPoint size:(CGSize)size { CGFloat radius_x = fmax(centerPoint.x, size.width - centerPoint.x); CGFloat radius_y = fmax(centerPoint.y, size.height - centerPoint.y); CGFloat endRadius = 2 * sqrtf(pow(radius_x, 2) + pow(radius_y, 2)); CGRect rect = {CGPointZero,CGSizeMake(endRadius, endRadius)}; return rect; } - (void)setToAnimation:(id<UIViewControllerContextTransitioning>)contextTransition { //获取目标动画的VC UIViewController *toVc = [contextTransition viewControllerForKey:UITransitionContextToViewControllerKey]; UIView *containerView = [contextTransition containerView]; // [toVc beginAppearanceTransition:YES animated:YES]; CGPoint center = toVc.view.center; CGRect rect = [self frameToCircle:self.centerPoint size:toVc.view.bounds.size]; UIView *backView = [[UIView alloc] initWithFrame:rect]; backView.backgroundColor = UICOLOR_FROM_RGB_OxFF(0xFFA500); backView.center = self.centerPoint; backView.layer.cornerRadius = backView.frame.size.height / 2.0; backView.transform = CGAffineTransformMakeScale(0.01, 0.01); [containerView addSubview:backView]; self.startView = backView; toVc.view.transform = CGAffineTransformMakeScale(0.01, 0.01); toVc.view.alpha = 0; toVc.view.center = self.centerPoint; [containerView addSubview:toVc.view]; [UIView animateWithDuration:self.duration animations:^{ backView.transform = CGAffineTransformIdentity; toVc.view.center = center; toVc.view.transform = CGAffineTransformIdentity; toVc.view.alpha = 1; } completion:^(BOOL finished) { [contextTransition completeTransition:!contextTransition.transitionWasCancelled]; // [toVc endAppearanceTransition]; }]; } ``` `setBackAnimation`也大同小异,就不再说明 ##### 4、翻书效果 这个还是花了些时间,主要不在思想上,而是在翻书有个阴影效果哪里,等下我会讲到。先说说思路,主要还是通过截图来实现。首先需要截当前`vc`的部分,如果向左滑则截右边,向右则截左,然后还需要截目标`vc`的两部分图,分别加到`containerView`上,假如现在向左翻,那么就要将目标`vc`的左边截图加到`containerView`的左边并且隐藏起来,让其绕`y`轴旋转`M_PI_2`,就是直插屏幕的样子,那么目标`vc`的右边截图就需要放到当前`vc`的下面,这样当当前`vc`在滑动的时候,我们就能看到下面的图了。当当前`vc`绕`y`轴旋转`-M_PI_2`的时候,目标`vc`的左边截图显示出来,并恢复原状,完成整副动画。 需要注意的是,截图在绕`y`轴旋转的时候,因为我们的`layer`的默认`anchorPoint`为`(0.5,0.5)`,所以需要改变`anchorPoint`的只,否则就绕中心在旋转了。 说了这么多,还是看看核心代码吧 ``` p.p1 {margin: 0.0px 0.0px 0.0px 0.0px; font: 14.0px Menlo; color: #3d71ff}p.p2 {margin: 0.0px 0.0px 0.0px 0.0px; font: 14.0px Menlo; color: #4dbf56}p.p3 {margin: 0.0px 0.0px 0.0px 0.0px; font: 14.0px Menlo; color: #00afca}p.p4 {margin: 0.0px 0.0px 0.0px 0.0px; font: 14.0px Menlo; color: #3d71ff; min-height: 16.0px}p.p5 {margin: 0.0px 0.0px 0.0px 0.0px; font: 14.0px Menlo; color: #2337da}p.p6 {margin: 0.0px 0.0px 0.0px 0.0px; font: 14.0px 'PingFang SC'; color: #4dbf56}span.s1 {font-variant-ligatures: no-common-ligatures}span.s2 {font-variant-ligatures: no-common-ligatures; color: #c2349b}span.s3 {font-variant-ligatures: no-common-ligatures; color: #00afca}span.s4 {font-variant-ligatures: no-common-ligatures; color: #3d71ff}span.s5 {font: 14.0px 'PingFang SC'; font-variant-ligatures: no-common-ligatures}span.s6 {font-variant-ligatures: no-common-ligatures; color: #4dbf56}span.s7 {font: 14.0px 'PingFang SC'; font-variant-ligatures: no-common-ligatures; color: #4dbf56}span.s8 {font: 14.0px Menlo; font-variant-ligatures: no-common-ligatures; color: #2337da}span.s9 {font: 14.0px Menlo; font-variant-ligatures: no-common-ligatures; color: #3d71ff}span.s10 {font: 14.0px Menlo; font-variant-ligatures: no-common-ligatures}span.s11 {font-variant-ligatures: no-common-ligatures; color: #8b84cf}span.s12 {font-variant-ligatures: no-common-ligatures; color: #93c96a}span.s13 {font-variant-ligatures: no-common-ligatures; color: #d28f5a} - (void)setToAnimation:(id<UIViewControllerContextTransitioning>)contextTransition { //获取目标动画的VC UIViewController *toVc = [contextTransition viewControllerForKey:UITransitionContextToViewControllerKey]; UIViewController *fromVc = [contextTransition viewControllerForKey:UITransitionContextFromViewControllerKey]; UIView *containerView = [contextTransition containerView]; //m34 这个参数有点不好理解 为透视效果 我在http://www.jianshu.com/p/e8d1985dccec这里有讲 //当Z轴上有变化的时候 我们所看到的透视效果 可以对比看看 当你改成-0.1的时候 就懂了 CATransform3D transform = CATransform3DIdentity; transform.m34 = -0.002; [containerView.layer setSublayerTransform:transform]; UIView *fromView = fromVc.view; UIView *toView = toVc.view; //截图 //当前页面的右侧 CGRect from_half_right_rect = CGRectMake(fromView.frame.size.width/2.0, 0, fromView.frame.size.width/2.0, fromView.frame.size.height); //目标页面的左侧 CGRect to_half_left_rect = CGRectMake(0, 0, toView.frame.size.width/2.0, toView.frame.size.height); //目标页面的右侧 CGRect to_half_right_rect = CGRectMake(toView.frame.size.width/2.0, 0, toView.frame.size.width/2.0, toView.frame.size.height); //截三张图 当前页面的右侧 目标页面的左和右 UIView *fromRightSnapView = [fromView resizableSnapshotViewFromRect:from_half_right_rect afterScreenUpdates:NO withCapInsets:UIEdgeInsetsZero]; UIView *toLeftSnapView = [toView resizableSnapshotViewFromRect:to_half_left_rect afterScreenUpdates:YES withCapInsets:UIEdgeInsetsZero]; UIView *toRightSnapView = [toView resizableSnapshotViewFromRect:to_half_right_rect afterScreenUpdates:YES withCapInsets:UIEdgeInsetsZero]; fromRightSnapView.frame = from_half_right_rect; toLeftSnapView.frame = to_half_left_rect; toRightSnapView.frame = to_half_right_rect; //重新设置anchorPoint 分别绕自己的最左和最右旋转 fromRightSnapView.layer.position = CGPointMake(CGRectGetMinX(fromRightSnapView.frame), CGRectGetMinY(fromRightSnapView.frame) + CGRectGetHeight(fromRightSnapView.frame) * 0.5); fromRightSnapView.layer.anchorPoint = CGPointMake(0, 0.5); toLeftSnapView.layer.position = CGPointMake(CGRectGetMinX(toLeftSnapView.frame) + CGRectGetWidth(toLeftSnapView.frame), CGRectGetMinY(toLeftSnapView.frame) + CGRectGetHeight(toLeftSnapView.frame) * 0.5); toLeftSnapView.layer.anchorPoint = CGPointMake(1, 0.5); //添加阴影效果 UIView *fromRightShadowView = [self addShadowView:fromRightSnapView startPoint:CGPointMake(0, 1) endPoint:CGPointMake(1, 1)]; UIView *toLeftShaDowView = [self addShadowView:toLeftSnapView startPoint:CGPointMake(1, 1) endPoint:CGPointMake(0, 1)]; //添加视图 注意顺序 [containerView insertSubview:toView atIndex:0]; [containerView addSubview:toLeftSnapView]; [containerView addSubview:toRightSnapView]; [containerView addSubview:fromRightSnapView]; toLeftSnapView.hidden = YES; //先旋转到最中间的位置 toLeftSnapView.layer.transform = CATransform3DMakeRotation(M_PI_2, 0, 1, 0); //StartTime 和 relativeDuration 均为百分百 [UIView animateKeyframesWithDuration:self.duration delay:0 options:UIViewKeyframeAnimationOptionCalculationModeLinear animations:^{ [UIView addKeyframeWithRelativeStartTime:0 relativeDuration:0.5 animations:^{ fromRightSnapView.layer.transform = CATransform3DMakeRotation(-M_PI_2, 0, 1, 0); fromRightShadowView.alpha = 1.0; }]; [UIView addKeyframeWithRelativeStartTime:0.5 relativeDuration:0.5 animations:^{ toLeftSnapView.hidden = NO; toLeftSnapView.layer.transform = CATransform3DIdentity; toLeftShaDowView.alpha = 0.0; }]; } completion:^(BOOL finished) { [toLeftSnapView removeFromSuperview]; [toRightSnapView removeFromSuperview]; [fromRightSnapView removeFromSuperview]; [fromView removeFromSuperview]; if ([contextTransition transitionWasCancelled]) { [containerView addSubview:fromView]; } [contextTransition completeTransition:![contextTransition transitionWasCancelled]]; }]; //本来打算用基础动画来实现 但是由于需要保存几个变量 在动画完成的代理函数中用,所以就取消这个想法了 // CABasicAnimation *fromRightAnimation = [CABasicAnimation animationWithKeyPath:@"transform.rotation.x"]; // fromRightAnimation.duration = self.duration/2.0; // fromRightAnimation.beginTime = CACurrentMediaTime(); // fromRightAnimation.toValue = @(-M_PI_2); // [fromRightSnapView.layer addAnimation:fromRightAnimation forKey:nil]; // // // CABasicAnimation *toLeftAnimation = [CABasicAnimation animationWithKeyPath:@"transform.rotation.x"]; // toLeftAnimation.beginTime = CACurrentMediaTime() + self.duration/2.0; // toLeftAnimation.fromValue = @(M_PI_2); // [toLeftAnimation setValue:contextTransition forKey:@"contextTransition"]; // [toLeftSnapView.layer addAnimation:toLeftAnimation forKey:@"toLeftAnimation"]; } ``` #####项目文件截图:  写到这里,差不多转场动画我能够写的就到这里了,文章实在是有点长,不是故意为之,只是我想写的稍微详细点,对自己也是一个很好的提升。如果能帮到你,还请给个`打赏`,嘿嘿~ 如果有什么不对的地方,还请多多指教,共同成长。
本实例支付的费用只是购买源码的费用,如有疑问欢迎在文末留言交流,如需作者在线代码指导、定制等,在作者开启付费服务后,可以点击“购买服务”进行实时联系,请知悉,谢谢
感谢
5
手机上随时阅读、收藏该文章 ?请扫下方二维码
相似例子推荐
评论
作者
敷衍丶尘世
16
例子数量
617
帮助
43
感谢
评分详细
可运行:
4.5
分
代码质量:
4.5
分
文章描述详细:
4.5
分
代码注释:
4.5
分
综合:
4.5
分
作者例子
iOS 仿支付宝密码支付
iOS 九宫格手势密码
iOS CAReplicatorLayer 简单动画
iOS 之UIBezierPath
iOS 核心动画 Core Animation浅谈
iOS CoreImage之滤镜简单使用
iOS UIButton文字和图片间距随意调整
iOS 简单引导界面
iOS 两种不同的图片无限轮播
iOSQuart2D绘图之UIImage简单使用
iOS 自定义键盘
iOS 自定义转场动画浅谈
iOS Core ML与Vision初识
iOS 11之Vision人脸检测
iOS之基于FreeStreamer的简单音乐播放器(模仿QQ音乐)
iOS 音频视频图像合成那点事