Android 实现完美文字左右对齐效果方案


概述
详细
Android 实现文字左右对齐效果方案
左右对齐的文字效果,很常见,在大多数文章上都可以看到,这种效果能给人带来一种界面整洁的效果,但是如果只是左对齐的话,页面显示就会参差不齐;而app的页面大多数都是图形+文字的显示效果,左右对齐的文字效果需求还是非常大的;而反观Android的官方控件TextView并没有提供这种左右对齐的显示效果,那么就只能自己来造轮子了。
一、TextView效果
首先,让我们先来看一下TextView的显示效果:
中文情况下还好,但是英文情况下的显示效果就不是很好看了,右边会留了很长的空白,对于追求用户体验的,这样的显示效果肯定是不能满足的;但是TextView内部也没有提供API给我们,那么就只能自己来实现了。
二、对齐原理
原理:将一行剩余的宽度平分给当前单词的间距,这样来达到左右对齐的效果;
那么我们就有两种实现方案:
(1)TextView绘制一行的计算原理简单粗暴,就是计算这一行显示不下一个单词的时候,就进行回车换行;TextView已经手动给我们计算出了一行能显示多少的字符,那么我们只需要通过计算剩余的宽度再进行绘制即可;
会存在问题:如果一行存在单词较少的情况,就会出现间隔过大的问题;
比如:

(2)通过手动计算一行能显示多少个字符,然后再计算剩余的宽度进行绘制;
这样只是比第一步多了个自己计算一行能显示多少个字符的操作;
但是这样也会存在问题:如果单词存在中英文混合,或者非中文的情况,会很大概率出现换行时单词被截断的问题;
比如:

三、最终方案
以上两种方案都会存在缺陷,那这样的话我们就得对出现的问题提出解决方案;
当前市场上有成熟的阅读软件,最常用的就是左右对齐的排版效果,来看看当前的阅读软件是怎么解决这些问题的;
先看一下微信读书app的显示效果:
再看一下掌阅app的显示效果:
微信读书和掌阅都是对这个过长的单词进行截断处理,然后使用“-”符号将这两个截断的单词连接起来,再进行绘制时就不会出现上述两种方案的问题;
那么最终方案就是:
通过手动计算一行能显示多少个单词,如果一行最后一个单词显示不下,则进行截断处理,中文则不不存在该问题,这里针对非中文的处理;然后再根据剩余空间进行绘制;
那么有了方案之后,接下来看看具体要怎么实现;
四、最终实现
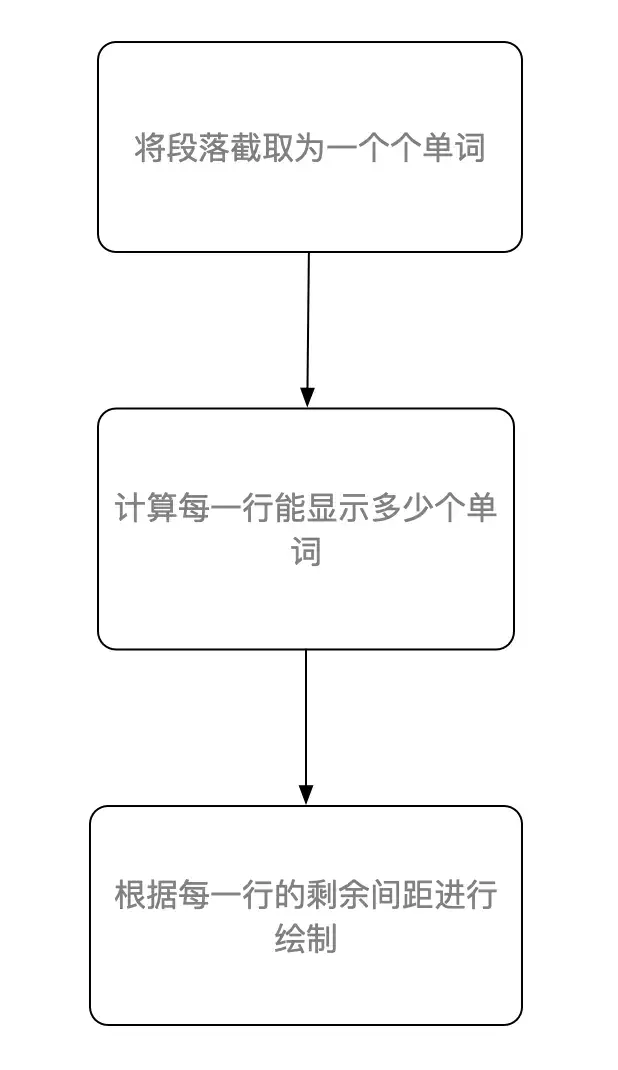
(1)先遍历当前页面的字符,将中英文截取为一个个单词,具体实现在getWordList(String text)方法里面;通过遍历当前的字符,判断如果为中文时,则为一个单词,非中文时则通过遍历该英文单词进行拼接,最后拼成一个非中文单词;
private fun getWordList(text: String): List<String> {
    if (TextUtils.isEmpty(text)) {
        return ArrayList()
    }
    Log.i(TAG, "getWordList ")
    val frontList: MutableList<String> =
        ArrayList()
    val str = StringBuilder()
    for (i in 0 until text.length) {
        val charAt = text[i].toString()
        if (charAt != BLANK) {
            if (checkIsSymbol(charAt)) {
                val isEmptyStr = str.length == 0
                str.append(charAt)
                if (!isEmptyStr) { // 中英文都需要将字符串添加到这里;
                    frontList.add(str.toString())
                    str.delete(0, str.length)
                }
            } else {
                if (isCN(str.toString())) {
                    frontList.add(str.toString())
                    str.delete(0, str.length)
                }
                str.append(charAt)
            }
        } else {
            if (!TextUtils.isEmpty(str.toString())) {
                frontList.add(
                    str.toString().replace(
                        BLANK.toRegex(),
                        ""
                    )
                )
                str.delete(0, str.length)
            }
        }
    }
    if (str.length != 0) {
        frontList.add(str.toString())
        str.delete(0, str.length)
    }
    return frontList
}
(2)通过遍历当前的单词,计算每一行要显示的单词集合,具体实现在getLineList(List<String> frontList)这个方法里面;遍历单词时,当添加最后一个单词时,宽度已经超过一行显示的距离,那么就判断最后一个单词是否为中文,是的话则添加到下一行,否则的话则进行截断处理;
private fun getLineList(frontList: List<String>): List<List<String>> {
    Log.i(TAG, "getLineList ")
    val sb = StringBuilder()
    val lineLists: MutableList<List<String>> =
        ArrayList()
    val lineList: MutableList<String> =
        ArrayList()
    var width = 0f
    var temp = ""
    var front = ""
    for (i in frontList.indices) {
        front = frontList[i]
        if (!TextUtils.isEmpty(temp)) {
            sb.append(temp)
            lineList.add(temp)
            if (!isCN(temp)) {
                sb.append(BLANK)
            }
            temp = ""
        }
        if (isCN(front)) {
            sb.append(front)
        } else {
            if (i + 1 < frontList.size) {
                val nextFront = frontList[i + 1]
                if (isCN(nextFront)) {
                    sb.append(front)
                } else {
                    sb.append(front).append(BLANK)
                }
            } else {
                sb.append(front)
            }
        }
        lineList.add(front)
        width = StaticLayout.getDesiredWidth(sb.toString(), paint)
        if (width > mViewWidth) { // 先判断最后一个单词是否是英文的,是的话则切割,否则的话就移除最后一个
            val lastIndex = lineList.size - 1
            val lastWord = lineList[lastIndex]
            var lastTemp = ""
            lineList.removeAt(lastIndex)
            if (isCN(lastWord)) {
                addLines(lineLists, lineList)
                lastTemp = lastWord
            } else { // 否则的话则截取字符串
                val substring = sb.substring(0, sb.length - lastWord.length - 1)
                sb.delete(0, sb.toString().length)
                sb.append(substring).append(BLANK)
                var tempLastWord = ""
                val length = lastWord.length
                if (length <= 3) {
                    addLines(lineLists, lineList)
                    lastTemp = lastWord
                } else {
                    var cutoffIndex = 0
                    for (j in 0 until length) {
                        tempLastWord = lastWord[j].toString()
                        sb.append(tempLastWord)
                        if (tempLastWord in vowels) { // 根据元音字母来进行截断
                            if (j + 1 < length) {
                                val nextTempLastWord =
                                    lastWord[j + 1].toString()
                                sb.append(nextTempLastWord)
                                width = StaticLayout.getDesiredWidth(sb.toString(), paint)
                                cutoffIndex = j
                                if (width > mViewWidth) {
                                    lastTemp =
                                        if (j > 2 && j <= length - 2) { // 单词截断后,前面的字符小于2个时,则不进行截断
                                            val lastFinalWord =
                                                lastWord.substring(0, cutoffIndex + 2) + "-"
                                            lineList.add(lastFinalWord)
                                            addLines(lineLists, lineList)
                                            lastWord.substring(cutoffIndex + 2, length)
                                        } else {
                                            addLines(lineLists, lineList)
                                            lastWord
                                        }
                                    break
                                }
                            } else {
                                addLines(lineLists, lineList)
                                lastTemp = lastWord
                                break
                            }
                        }
                        width = StaticLayout.getDesiredWidth(sb.toString(), paint)
                        // 找不到元音,则走默认的逻辑
                        if (width > mViewWidth) {
                            lastTemp =
                                if (j > 2 && j <= length - 2) { // 单词截断后,前面的字符小于2个时,则不进行截断
                                    val lastFinalWord =
                                        lastWord.substring(0, j) + "-"
                                    lineList.add(lastFinalWord)
                                    addLines(lineLists, lineList)
                                    lastWord.substring(j, length)
                                } else {
                                    addLines(lineLists, lineList)
                                    lastWord
                                }
                            break
                        }
                    }
                }
            }
            sb.delete(0, sb.toString().length)
            temp = lastTemp
        }
        if (lineList.size > 0 && i == frontList.size - 1) {
            addLines(lineLists, lineList)
        }
    }
    if (!TextUtils.isEmpty(temp)) {
        lineList.add(temp)
        addLines(lineLists, lineList)
    }
    mLineCount += lineLists.size
    return lineLists
}
(3)通过第二步计算出来的每一行的单词,计算剩余的距离进行绘制;
/**
 * 绘制左右对齐效果
 *
 * @param canvas
 * @param line
 * @param paint
 */
private fun drawScaledText(
    canvas: Canvas?,
    line: List<String>?,
    paint: TextPaint?
) {
    if (canvas == null || line == null || paint == null) {
        return
    }
    val sb = StringBuilder()
    for (aSplit in line) {
        sb.append(aSplit)
    }
    val lineWidth = StaticLayout.getDesiredWidth(sb, getPaint())
    var cw = 0f
    cw = if (GRAVITY_START == textGravity) {
        mPaddingStart.toFloat()
    } else if (GRAVITY_END == textGravity) {
        mPaddingEnd.toFloat()
    } else {
        mPaddingStart.toFloat()
    }
    val d = (mViewWidth - lineWidth) / (line.size - 1)
    for (aSplit in line) {
        canvas.drawText(aSplit, cw, mLineY, getPaint())
        cw += StaticLayout.getDesiredWidth(aSplit + "", paint) + d
    }
}
(4)实现流程框架图
五、进阶优化
(1)代码里修改了绘制的逻辑后,那么关于TextView的一些基础属性也要进行适配;
比如布局的方向,可以使用TextView自带的属性来进行设置;通过android:gravity=""和android:textAlignment=""属性来定义布局的文字方向,是居左还是居右边,这两个属性都可以进行设置,textAlignment属性的优先级比较高,如果同时设置的话,那么则以textAlignment属性为准;
<com.czm.xctextview
android:layout_width="match_parent"
android:layout_height="wrap_content"
android:layout_margin="10dp"
android:textSize="16sp"
android:gravity="start"
android:textAlignment="textStart"/>
(2)对于实现的英文单词截断的效果,还有优化的地方,经过一些小伙伴的提醒,发现还可以通过音节的进行拆分,再去研究了一波微信读书和掌阅的截断效果,发现确实是使用了音节来进行截断,这样展示效果就更加完美了;
后面研究了一波资料后,发现可以通过元音来进行截断,英语单词的元音有5个,分别是a,e,i,o,u; 那么就可以通过元音加一个辅音的规则来进行截断;比如an,en之类的;这里只实现了一种规则来进行截断,其他的规则过于复杂,暂时没有引入;
看一下优化后的效果:

六、控件使用
<?xml version="1.0" encoding="utf-8"?>
<ScrollView xmlns:android="http://schemas.android.com/apk/res/android"
    xmlns:app="http://schemas.android.com/apk/res-auto"
    xmlns:tools="http://schemas.android.com/tools"
    android:layout_width="match_parent"
    android:layout_height="match_parent"
    android:orientation="vertical"
    tools:context=".MainActivity">

    <LinearLayout
        android:layout_width="match_parent"
        android:layout_height="wrap_content"
        android:orientation="vertical">
        <com.czm.xctextview.XCJustifyTextView
            android:id="@+id/just"
            android:layout_width="match_parent"
            android:layout_height="wrap_content"
            android:paddingTop="20dp"
            android:paddingBottom="10dp"
            android:paddingStart="10dp"
            android:textSize="16sp"
            android:paddingEnd="20dp" />

        <com.czm.xctextview.XCJustifyTextView
            android:id="@+id/just2"
            android:layout_width="match_parent"
            android:layout_height="wrap_content"
            android:paddingTop="20dp"
            android:paddingBottom="10dp"
            android:paddingStart="10dp"
            android:textSize="16sp"
            android:paddingEnd="20dp"
            android:text="[垃圾桶讲完了,哦不,是缓存层级讲完了。这里提一句,其实还有一层没有提到,因为它不在Recycler这个类中,它在ChildHelper类中,其中有个mHiddenViews,是个缓存被隐藏的ViewHolder的ArrayList。到这里我想大家对这几层缓存心里已经有个数了,但是还远远不够,这么多层缓存是怎么工作的?什么时候用什么缓存?各个缓存之间有没有什么PY交易?如果让你自己写一个LayoutManager你能处理好缓存问题么?就好比垃圾分类后,我们知道每种垃圾桶的定义和功能,但是面对大妈灵魂拷问我依然分不清自己是什么垃圾,我太难了~相比之下,RV的几个垃圾桶简单多了,下面我们一起来看看,这些个缓存都咋用。"/>

    </LinearLayout>

</ScrollView>
class MainActivity : AppCompatActivity() {
    private val text = "Hooray! It's snowing! It's time to make a snowman.James runs out. He makes a big pile of snow. He puts a big snowball on top. He adds a scarf and a hat. He adds an orange for the nose. He adds coal for the eyes and buttons.In the evening, James opens the door. What does he see? The snowman is moving! James invites him in. The snowman has never been inside a house. He says hello to the cat. He plays with paper towels.A moment later, the snowman takes James's hand and goes out.They go up, up, up into the air! They are flying! What a wonderful night!The next morning, James jumps out of bed. He runs to the door.He wants to thank the snowman. But he's gone."
    private val text1 = "AppCompatActivity AppCompatActivityActivityActivityActivity"
    private val text2 = "For every layout expression, there is a binding adapter that makes the framework calls required to set the corresponding properties or listeners. For example, the binding adapter can take care of calling the setText() method to set the text property or call the setOnClickListener() method to add a listener to the click event. The most common binding adapters, such as the adapters for the android:text property used in the examples in this page, are available for you to use in the android.databinding.adapters package. For a list of the common binding adapters, see adapters. You can also create custom adapters, as shown in the following example:"

    override fun onCreate(savedInstanceState: Bundle?) {
        super.onCreate(savedInstanceState)
        setContentView(R.layout.activity_main)
        just.text = text2

    }
}
七、最终效果
八、项目结构目录图