基于Qt实现Linux或Windows串口打印工具
概述
linux或window下打印工具多种多样,但有时不是很符合自己的需求,在此提供一份基础的串口打印工具代码,可以在此基础上增加实现自己需要的功能。
详细
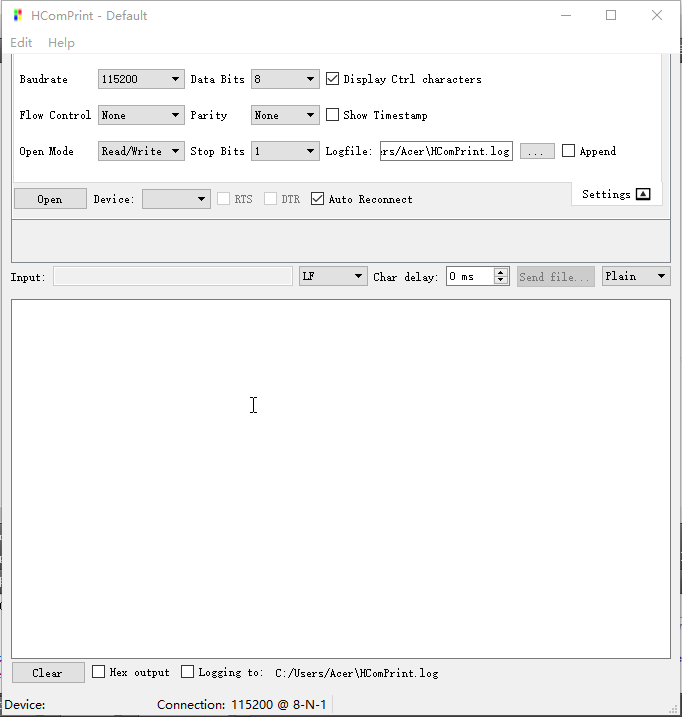
一、运行结果

二、实现过程
1.打开串口
首先我们需要创建一个QSerialPort对象,然后调用它的open函数打开串口设备,然后再调用它的
bool setBaudRate(qint32 baudRate, Directions directions = AllDirections);
bool setDataBits(DataBits dataBits);
bool setParity(Parity parity);
bool setStopBits(StopBits stopBits);
等函数,设置串口波特率,数据位数,校验方式,停止位等参数。
代码如下:
    m_device->setPortName(session.device);
    m_deviceState = DEVICE_OPENING;
    if (m_device->open(session.openMode)) {
        m_reconnectTimer.stop();
        m_deviceState = DEVICE_OPEN;
        // printDeviceInfo(); // debugging

        m_device->setBaudRate(static_cast<qint32>(session.baudRate));
        m_device->setDataBits(session.dataBits);
        m_device->setParity(session.parity);
        m_device->setStopBits(session.stopBits);
        m_device->setFlowControl(session.flowControl);

        /* Disable RTS/DTR when no flow control or software flow control is used */
        if (QSerialPort::FlowControl::HardwareControl != session.flowControl) {
            // Force to emit QCheckBox::stateChanged signals to set proper logic levels on DTR/RTS lines.
            // Note that on Linux when opening serial device even with no flow control, DTR and RTS lines are set to
            // logic high, in RS232 that means a negative voltage on these lines (or just 0V for TTL based USB-UARTs).
            // So this applies the same settings after reopen the device, and sets RTS/DTR to logic low when opening for
            // first time when no flow control or software flow control is set.
            emit controlPanel->m_dtr_line->stateChanged(controlPanel->m_dtr_line->checkState());
            emit controlPanel->m_rts_line->stateChanged(controlPanel->m_rts_line->checkState());
        }

        m_device->flush();

        controlPanel->m_combo_device->setEnabled(false);
        m_previousChar = '\0';

        // display connection parameter on status bar
        m_device_statusbar->setDeviceInfo(m_device);

        // enable all inputs if writing to the device is enabled
        if (session.openMode == QIODevice::WriteOnly || session.openMode == QIODevice::ReadWrite) {

            m_input_edit->setEnabled(true);
            m_input_edit->setFocus();
            m_bt_sendfile->setEnabled(true);
            m_command_history->setEnabled(true);
        }
    }
2. 读取串口数据
首先调用QSerialPort对象的readAll函数读取数据。
QByteArray readAll();
然后写数据到日记文件中,最后将数据显示在屏幕上。
具体代码如下:
    QByteArray data = m_device->readAll();
    if (m_logFile.isOpen()) {
        m_logFile.write(data);
        m_logFile.flush();
    }
    m_output_display->displayData(data);
3.给串口发送数据
先从QLineEdit控件获取需要发送的数据,再添加一下换行符之类的数据,然后调用write函数,写数据到串口.
具体代码如下:
    QString cmd = m_input_edit->text();
    m_input_edit->clear();
    if (!m_device->isOpen()) {
        return;
    }
    sendString(&cmd);
bool MainWindow::sendString(QString *s)
{
Settings::LineTerminator lineMode = m_combo_lineterm->currentData().value<Settings::LineTerminator>();
// ToDo
unsigned int charDelay = static_cast<unsigned int>(m_spinner_chardelay->value());
// converts QString into QByteArray, this supports converting control characters being shown in input field as
// QChars
// of Control Pictures from Unicode block.
QByteArray bytes;
bytes.reserve(s->size());
for (auto &c : *s) {
bytes.append(static_cast<char>(c.unicode()));
}
for (int i = 0; i < bytes.length(); i++) {
if (!sendByte(bytes[i], charDelay))
return false;
}
switch (lineMode) {
case Settings::LF:
if (!sendByte('\n', charDelay))
return false;
break;
case Settings::CR:
if (!sendByte('\r', charDelay))
return false;
break;
case Settings::CRLF:
if (!sendByte('\r', charDelay))
return false;
if (!sendByte('\n', charDelay))
return false;
break;
default:
break;
}
return true;
}
bool MainWindow::sendByte(const char c, unsigned long delay)
{
if (!m_device->isOpen()) {
return false;
}
if ((m_device->write(&c, 1)) < 1) {
qDebug() << m_device->errorString();
return false;
}
if (delay) {
millisleep(delay);
m_device->flush();
}
return true;
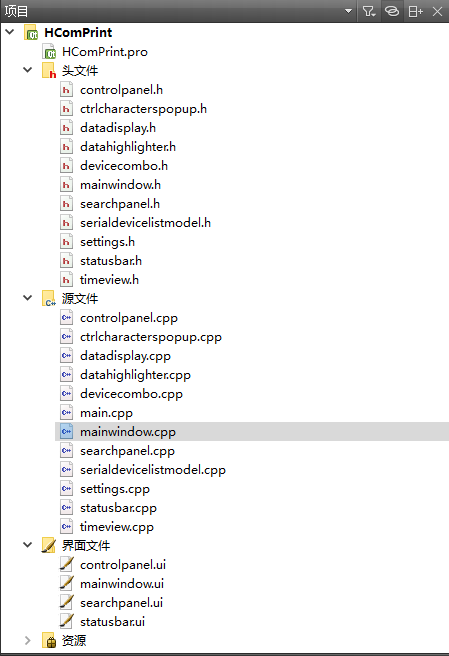
}三、项目结构图

四、使用介绍
1.首先选择需要打开的串口设备,Linux系统下通常是/dev/tty? 或 /dev/ttyUSB? , Windows系统下可以通过在我的电脑>右键>管理>设备管理器>串口设备>查看哪个是你需要打开的设备。
2.设置波特率,位数,校验码,停止位等参数。
3.如果需要将打印写到文件中,则需勾选程序下发Logging to 前面的复选框。
4.按open按钮打开设备
5.如果需要发送数据,则在Input后的输入框数据需要发送的数据,然后按回车键,即可发送数据。
本实例支付的费用只是购买源码的费用,如有疑问欢迎在文末留言交流,如需作者在线代码指导、定制等,在作者开启付费服务后,可以点击“购买服务”进行实时联系,请知悉,谢谢
手机上随时阅读、收藏该文章 ?请扫下方二维码


